
What the ignition does and how it does it
Within a petrol engine, a spark is required at the exact moment when a gas (of air and petrol) is compressed by a piston. For the spark to exist at all depends upon three essential parts: the distributor, the coil and the contact breaker. There are two electrical components in this system, called the High Tension (HT) and Low Tension (LT) circuits.
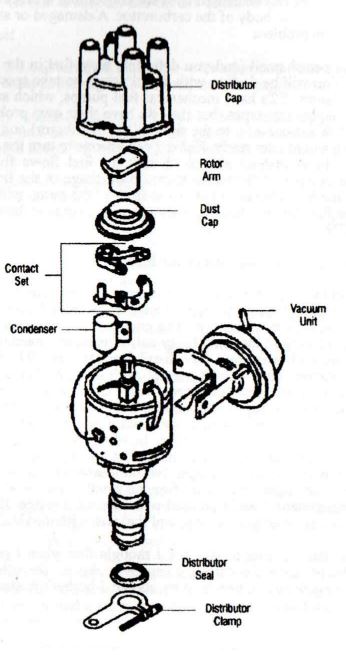
The LT circuit consists of the battery, the coil and the bottom bits of the distributor, namely the contact (with its points) and the condenser. The HT circuit has the spark plugs (and their leads), the top part of distributor, namely the cap and the rotor arm, and the link cable from the coil to the cap.
The coil is essentially two windings of cable; a primary winding of only a few turns of thick wire and a secondary winding of many thousands of turns of finer wire. Initiating voltage to the coil (and starter) is activated by the ignition switch and supplied by the battery. The energy goes directly to the coil’s primary winding, then to the condenser and contact breaker. (The condenser is there to prevent excessive arcing at the points). The primary coil is now active but at an exact moment (when the contact breaker points open), the circuit is broken, and this generates a very high voltage within coil’s secondary winding.
We now begin to follow the HT circuit. From the short link between the coil and distributor, thousands of volts are fed to the rotor arm via a graphite bush, inside the distributor’s cap. Here also are the terminals to all of the engine’s spark plugs. The rotor arm feeds each one in turn as it rotates, again at an exact moment, and the spark plugs receive several thousand volts, arcing across their end terminals.
The HT circuit is completed and an explosion occurs within the cylinder, forcing the piston down.
Ignition fault finding
Symptom – The engine turns over, but doesn’t fire at all.
The chances are that it’s an ignition problem; to make sure, pull a lead off a spark plug, hold it near the engine block and get someone to turn the engine over. A big blue spark means a carburettor (fuel) problem (see later), or defective plugs.
So there’s no spark at all. It’s a good idea now to determine whether fault lies in the Low Tension or High Tension circuit, as this then eliminates a number of variables, saving time.
Pull out the short HT link from the coil terminal and hold it a few millimetres away from its socket. Get someone to turn the engine and watch for a spark. If there is a spark, the HT leads to the plugs or the upper part of the distributor is defective. No spark at all means the coil is suspect and the LT circuit needs testing.
Testing the HT circuit
Put the link back into the coil terminal and remove its other end from the distributor cap. Hold the end close to the engine block and turn the engine over. A weak spark probably means the condenser is short circuiting; don’t mess about with it, it’s irreparable, and easy to replace. No spark at all means the HT link from coil to distributor is defective, or the coil has had it. Replace both.
A strong spark means that we have to apply another test.
Replace the short link into the distributor cap terminal and remove one of the plug leads from the cap, and hold it close to its terminal. Tum the engine over. If there’s no spark, the distributor cap is defective (dirt, moisture or cracks). Ensure the graphite bush and its spring are clean; examine the rotor arm and clean if necessary. Clean the spark plug terminals. If damp, spray everything with WD 40.
If there’s a spark, the leads to the plugs are defective; it is possible that the plugs themselves are also suspect. Take out each lead in turn, hold it close to the engine block, and turn over the engine. If there’s no spark, the HT lead is defective; replace it.
If there is a spark, the plug is defunct; again, replace it.
Dealing with the Low Tension circuit
Notice the term – dealing. Testing the Low Tension side of the distributor and coil requires the use of a test light or meter. If you suspect this is where the trouble lies (after going through the High Tension circuit), it saves time and trouble to just replace the contact breaker points, condenser and maybe the coil (though having no moving parts, it seldom goes wrong). Double-check the wiring; frayed or loose terminals increase electrical resistance, loading the circuit. Sometimes all
that is required is application of a screwdriver, and you’re on the way again. Carrying spare points, condenser and a rotor arm should be as second nature as having a spare alternator belt and bulbs.
Carburettor problems
The carburettor is a precision device and shouldn’t be tinkered with unless you know what you’re doing. Flooding the engine (with petrol) is a very common fault, especially when the vehicle is new to you, or when the engine’s hot. In most cases, all that is required is to rest the engine for a few minutes and try starting again. If the engine fires and splutters, press the accelerator gently (choking). If it still splutters and dies and there’s a definite petrol smell, flooding is the problem.
Repeated flooding can be caused by a sticking choke, a blocked air filter or damage to the float in the body of the carburettor. A damaged or sticking needle valve may also be the problem.
If there’s no petrol smell (and you definitely have fuel in the tank), suspect fuel starvation. You will be dealing with liquid petrol, so take special care with sparks and naked flames. Type 1 upright engines are likely to have mechanical fuel pumps, which are more robust than electrical (diaphragm) types, but they do have their own problems. Find the fuel pump (on air-cooleds, to the right of the distributor) and disconnect the fuel inlet, having a container ready. Either get someone to turn the engine over or do it yourself by hand (safest) and check that the fuel flows from the pump. If it doesn’t, the pump is defective or there’s a blockage in the line or the fuel filter.
Removing the brass hexagon nut at the front of the pump will reveal the pull-out filter. If the fuel line is blocked, a garage will arrange to have the system blown through.
Where am I going wrong? A cry for help.
I have a 1600 twin port in a 1971 T2 camper and average 21 mpg. I drive around at 50-55 mph and don’t go for rapid acceleration. It’s a Devon Moonraker conversion with a low profile pop-top. The engine is a new Veggie replacement, but gives the same mpg as the rattly leaky nail it replaced – much smoother, though.
Timing is set with a strobe – 009 distributor (10 deg BTDC), TDC mark confirmed as correct, plug colour normal with a slight tan coloured deposit and there’s no sign of fuel leaks anywhere. Valve clearances at 0.006 thousandths, checked regularly, but never much adjustment needed and no signs of a misfire; starts well and idles smoothly. New coil, normal carburettor and exhaust (9 months old); tailpipe is always black inside, but no build-up of carbon. The carb has been stripped, cleaned and rebuilt with new float valve, adjuster screws, diaphragms and gaskets with no effect on mpg. No noticeable smoke when driving; oil bath air cleaner looks clean; brakes are free, no smell of petrol when parked, or in the engine compartment; 20w50 oil used with negligible usage. Even on a long run at 55mph I’ve only ever got 24 mpg, and that was with the OLD engine. HELP! !??
Sounds familiar? It does to me; and I thought that when I got round to fitting a 009 distributor, gave the carb a going over and all the things the poster has done, my mpg would improve. Why should I bother? Better to save the money and spend it on petrol!
Why is the mixture so rich – are we to believe that a black inside to the exhaust is normal? (But the plugs seem OK). Can anyone help? Is there something obvious that can be done to improve the mpg that the poster tried? Even if it only improves by 3 or 4 mpg, it’s got to cheer him up, after spending all that money. This guy seems to know what he’s doing, and I sure as hell don’t want to fill the pockets of Shell/Esso/Texaco shareholders while I’ve got my T2.
Vacuum unit
It may seem unlikely, but the answer could lie within this clever gadget on the side of the distributor. The vacuum unit changes the timing of the engine at higher revs giving you a more accurate spark at the time that you need it. This means a better burn, in turn giving the spark at the right time, giving more power, less wasted fuel and therefore better economy.
A worn distributor or the lack of a vacuum unit can be done easily and does not take long for a professional mechanic if you want to outsource it. To buy a brand new SVDA distributor from Accuspark with electronic ignition to dispense with old fashioned points will cost you around £80. This should give you another 3mpg over a non vacuum 009 distributor – more if it is worn!
At 21mpg the fuel is costing you 33 pence per mile.
If the new distributor increases that by 3mpg to 24mpg then the price per mile drops to 28.5p saving you 4.5 pence. Payback on your £80 is in 1,800 miles.
Plus your oil temperature will be slightly lower, what’s not to like?
