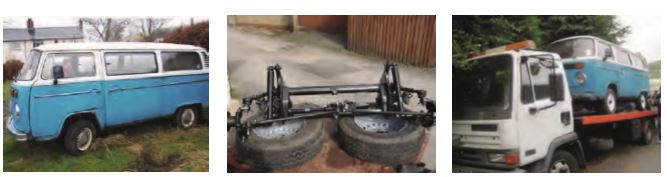
This edition of Member’s Motor looks at Bob Grimley’s ownership journey of Baldrick. We purchased Baldrick in 2009 and it took 4 years and a lot of hard work to get him on the road again. Baldrick is a 1979 Type 2 Deluxe people carrier; one of the last ones that originated from Germany. He was found rotting in a garden in Wales, in a sorry state with grass growing through the floor and rot that was so bad in places that it made it impossible to move from the site initially.
The first job was to remove the front beam, which was beyond repair. A second hand rust free replacement was found at the Stamford Hall and we fitted a pair of axle adjusters so we could fit Baldrick in the garage at home. The next stage was to bring the camper back from Wales, to do this we hired a low loader and drove it home.
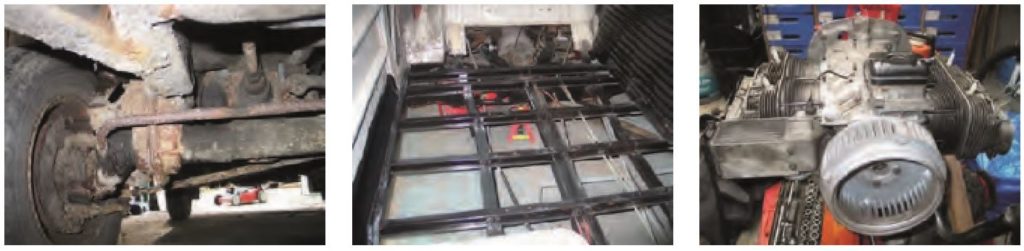
We knew he had his issues when we bought him but it was only after he was home that we found out just how rotten Baldrick was. Repair involved cutting off the some of the front, sides and chassis. After the purchase of many new panels the rebuild could start, thanks to my late son Paul (a VW enthusiast and exceptionally skilled engineer) we successfully made many new parts, which at the time you could not buy.
After the body work was completed, it was time to start on the engine which was a 2000cc Type 4. A total strip down of the engine was done at home using new parts (unfortunately twice the price of the similar but smaller parts available for the 1600cc engine). New pistons, valves and cam were fitted. The existing twin carburettors were removed and 32/36 Webbers were fitted. A new wiring harness and leisure battery was fitted as well as a rev counter, oil gauge, temperature gauge and volt meter.
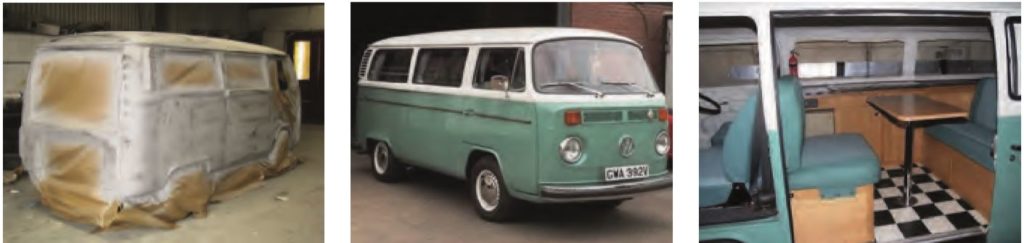
Next job was paint; I tried to spray it myself at home but ultimately failed, realising it was beyond my skill set, I hired a professional. The paint job took 6 weeks to complete, the bare metal re-spray was completed using Turkish and white; this was the only job we did not do ourselves. After 4 years the paint is still stunning and looks as good as the day it was done.
The final part of Baldrick’s evolution was converting him into a camper. The layout we chose was a 3/4 bed and units down the side with a fridge, cooker and sink. A toilet is fitted under the buddy seat.
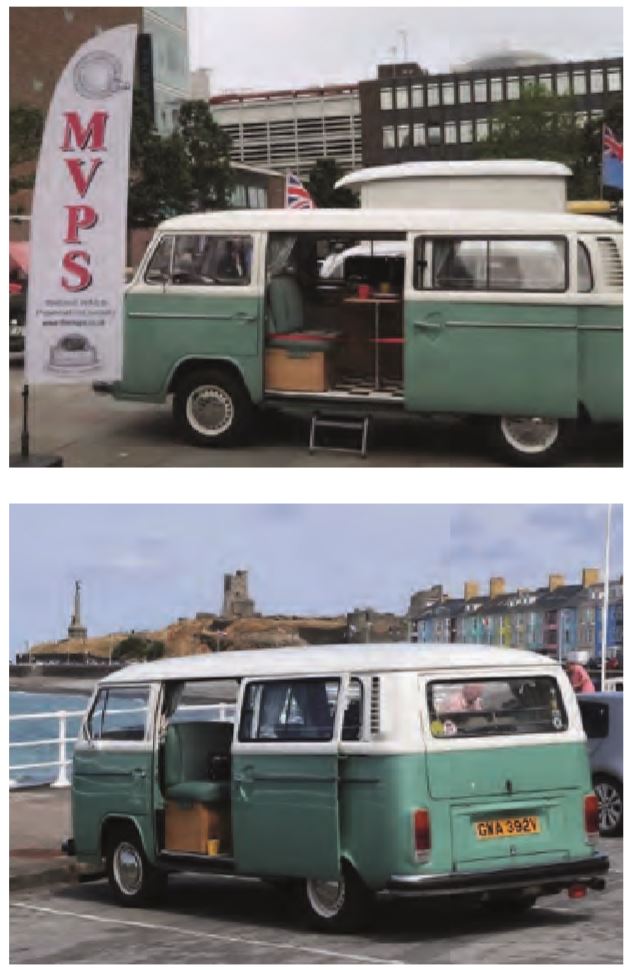
A new roof lining and ply floor were fitted as well as a removable table. All the upholstery, beds, cushions and curtains were made by my wife Linda. The units are all solid oak, made from Ikea kitchen doors, found in the clearance section of our local store. As we use Baldrick, he evolves slowly to suit our needs, the latest additions being a suspension handling kit, tow bar, Propex heater and retro radio; ensuring his classic looks are not spoiled. Baldrick is a real member of the family, loved by one and all, whether he is out at classic car shows or relaxing at a camp site by the sea, he makes anyone that sees him smile.
The next edition of the club magazine has been finished by our Editors and looks fantastic. It should be arriving through your door soon!
If you are enjoying the club magazine and have a story about a trip, an upgrade, a restoration or just a tip, send a contribution to our Editor Phil at editor@vwt2oc.co.uk.
How many of you struggle with fuel as your gauge does not work? You fill up, note the mileage then fill up again at 200 miles and hope for the best. Actually, the fuel gauge is almost certainly working, but the sender unit is at fault.
If you put a test meter on the sender, you should see about 73 ohms (Beetle and late bay) or 100 ohms (early bus with a balance coil gauge) across the rheostat when the tank is completely empty. As the tank is filled, the heater receives more current, moving the needle upwards on the gauge / dial until the tank is full sending the most current to the gauge at which point the tester should read about 10 ohms.
At the back of your dashboard you will find the wiring to the speedo. On top of the fuel tank behind the firewall, behind the engine, you will find the sender.
Where is the fault?
The simplest check to find the fault is to remove the wire that is NOT brown from the top of the sender. The brown one is an earth on a late bay and an early bay only has a single wire. The gauge in the dashboard should go immediately to empty. Take that same wire and earth it (but not to the tank). Now the gauge should immediately jump to full.
If you have a brown wire, double check that it does actually go to earth and makes a good connection.
If the gauge went to empty and full during testing and the earth is good then the sender is faulty and can be replaced from the normal stockists. Bad news is that the early bay ones are about £60 and late bay ones are about £30.
If the issue is intermittent, tighten the hex bolts on the back of the gauge and check the fuse supplying this circuit has completely clean contacts and good cable.
Spend since last report: £625.59.
Total hours labour since last report: 23.2
In the last exciting episode of
“Eric and the halfwit”, the rear had been mainly finished, Eric was pushed into
the corner of the garage and the front was started. Three years ago this month,
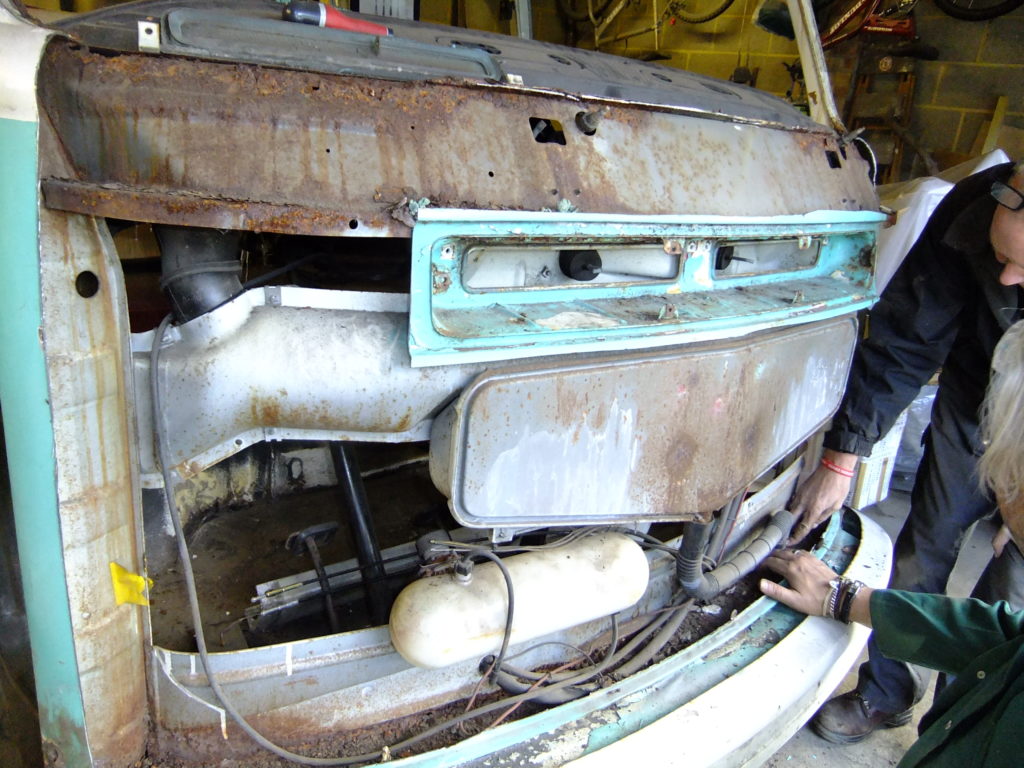
we had removed the bulk of the front panel, exposing the A posts (the
structural pieces in the front corners). I already knew that the bottoms of the
A posts were rotten, the deformation panel that sits behind the bumper was also
rotten and the inner valance behind that, which is welded to the chassis, was
also rusty or rotten.
Here is how it looked in October 2016.
Removing the nose was a case of
cutting around the air intake and down the inside edges of the A posts then
along the bottom around floor level. Once the majority of the metal is out of
the way, you can see what is going on and peel the edges off the A posts. That
was how I discovered that the bottoms were in need of help. That was 3 years
ago!
The inner windscreen panel
sitting just above the air intake was in poor condition caused by the regular
problem of a leaking windscreen seal. A lot of it was ok but the key piece is
the top which had rotted. As I removed the dashboard, I could see that the
mounting brackets forming part of the inner windscreen were also in a very bad
state. The dashboard came out a lot easier than I expected, two bolts on each
side visible when you open the doors and a couple underneath the middle.
Getting the knobs for the switches off the dashboard to keep the wiring
together took longer!
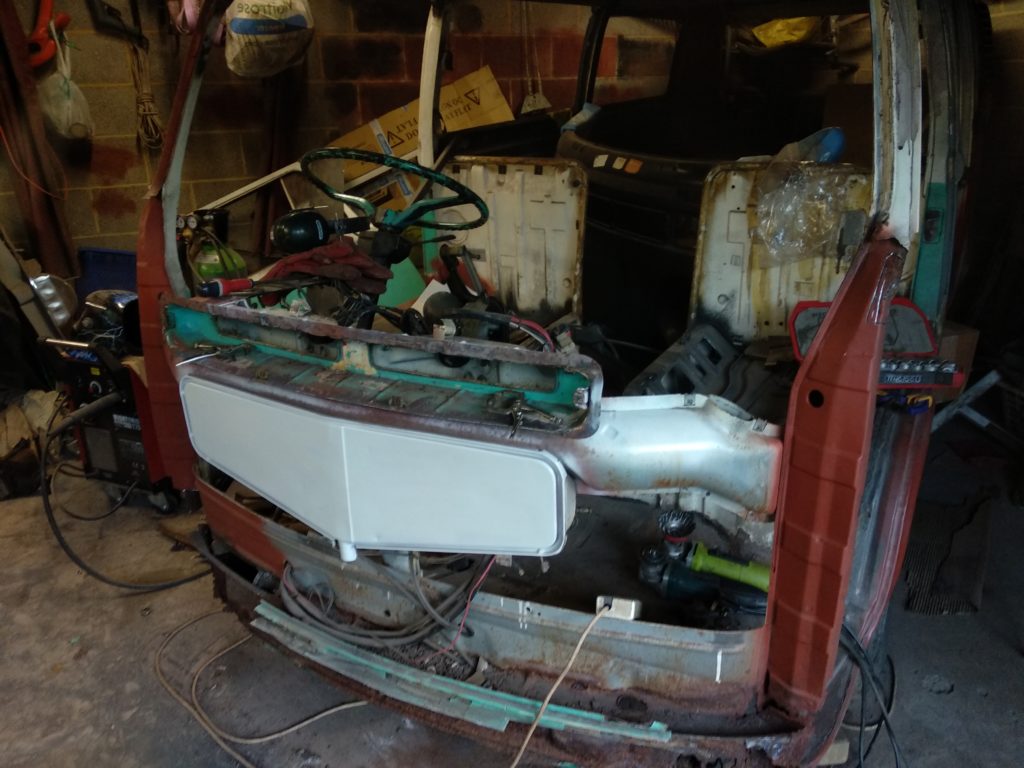
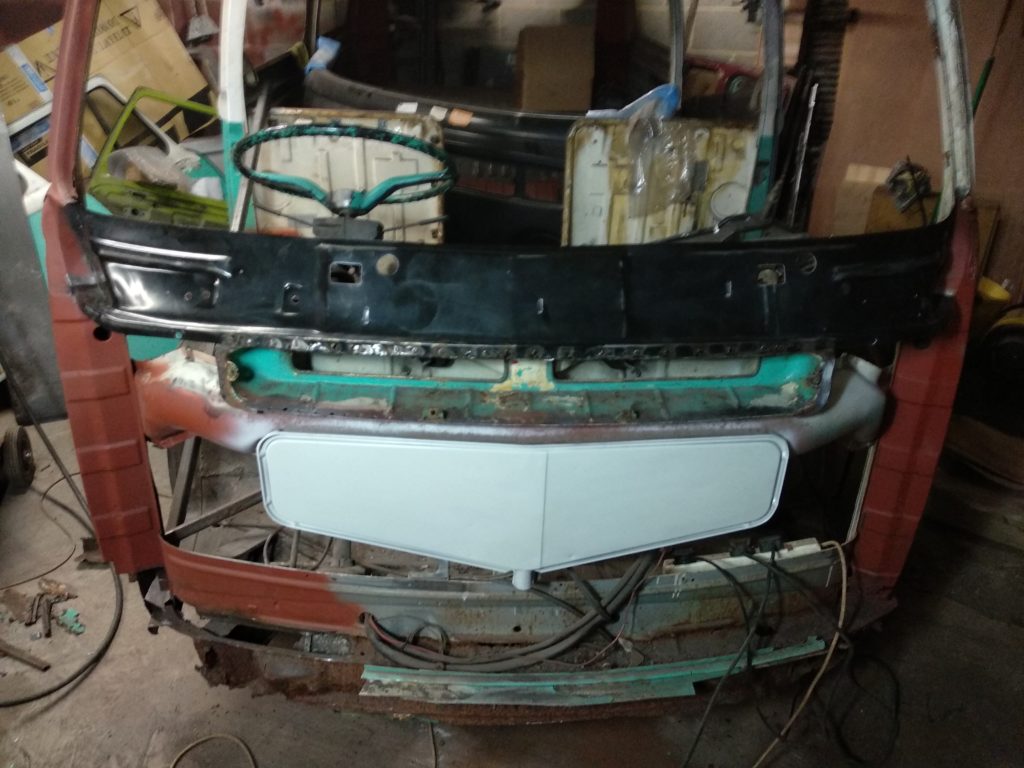
Once the inner windscreen was measured to see exactly where it fits to the A posts and once I had worked out whether it sits in front of the air intake or behind, the angle grinder got it out quickly.
Removing that panel gave a good
feeling as it was cleaner and tidier. A good clean up of all retained surfaces
and the Just Kampers replacement panel was scoured, primed and top coated on
the inside in the L90D pastel white that I plan for the inside of the whole
van. Welding that panel in early means added strength as I move down the front
removing rot.
And just as much as removing the old panel helped, adding the new one gave me a lift as well.
The multi-part A posts are
thicker steel (circa 2.5mm) giving a huge amount of strength when not rotten.
Taking out the rotten A post pieces a section at a time, I made cardboard
templates of the missing metal, angle grinding the replacements to shape. Once
into the right shape, they were clamped into place and welded in – for whatever
reason, my welding ability, confidence and end results are significantly improved
in the last few months, no idea why.
I was able to chop out the rot
knowing that there is enough strength to move one section at a time without the
shape changing. With a hole cut, I can get into the inside of the A post with
the rust killer and the primer to give extra life and I prudently stopped the
repairs near the bottom as I do not know the exact line of some of the metal.
You can buy a full replacement A
post but removing it is just too worrying and not required, so I laid on the
garage floor looking at the construction of the rotten originals, angle
grinding tiny bits to peel back the metal to see how it fits. The new repair
section is about eight inches tall in two parts for the A post on each side
plus a further piece to hold the inner valance. Those three themselves took
some time to figure out how they connect.
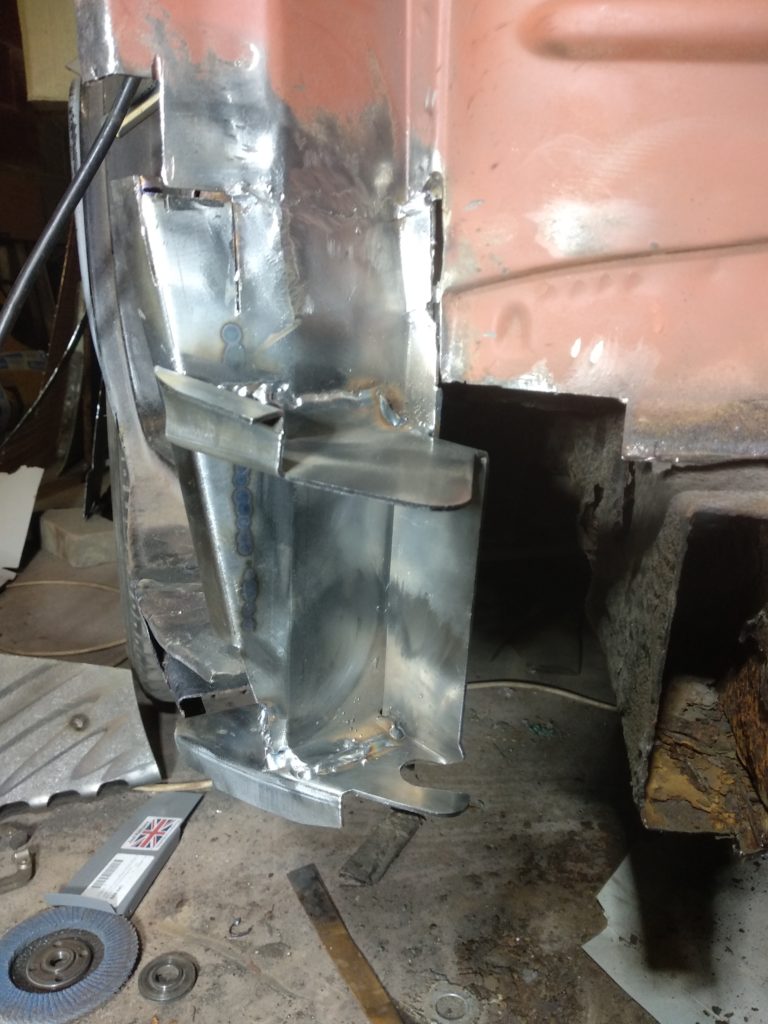
Once the mental work was completed, the physical work started. Grinding out the old rust, leaving the door hinge intact makes access difficult and lying on the floor looking up means metal dust in the hair. Eventually the rust was all out, and the area cleaned and prepared for the new metal. Part of the new metal needed trimming since I was retaining the A post behind the hinge. Deep breath, put the new against the old, clamps and rulers to ensure it all lines up and a tack weld first. It all looked good and was zipped in. Then the front of the A post could be put on confidently as it folds part way around the rear. Careful welding was needed to ensure that the valance hanger was not obstructed by weld. Then finally welding-in of that hanger which also fits specifically to the front repair piece. All zipped in with seam welds for strength and being nice thick metal, I can crank up the power to get lots of penetration.
This is the offside, note the
missing pieces at the top left which can now be added as I have both top and
bottom to use as a template. Having removed part of the step to chop the old
metal out, that was welded back in as well and plenty of red oxide anti-rust
paint was added to hopefully keep the rust gremlins at bay for a while.
The confidence that comes from
completing a job yourself means that the nearside was much less time consuming
since the concept is the same, just mirrored. Hack out the old bits, save the
hinge and the A post under it, chop out the step, accept that the angle grinder
makes heat which means underseal starts smoking. Once out, cleaned and the
repair piece trimmed since I am keeping part of the original again, it was time
to weld it in place. As previously, a few tacks to allow the clamps to come off
and I seam welded the old to the new all the way along. The rear half of the
repair completed, I painted it with anti-rust paint then primer.
Allowing that to dry, I started
attacking the inner valance that runs behind the deformation panel which sits
behind the bumper on a late bay (early bays don’t have a deformation panel
which was part of the added strength for crumple zones). Again, the outer foot
or so was toast and there is no sense leaving the middle and grafting new ends,
the whole lot needed to come out. This also allows access to the four chassis
sections behind that I know are paper thin and can be removed using your
fingers! A job for another day.
Cutting disks do not last long
with the removal of a lot of thick metal / rust / rot but I have plenty. It
took about five disks to remove the bulk of the valance. Sitting on top of that
is the panel you see in front of your feet when driving, which comes down
vertically then turns horizontally and is spot welded to the inner valance
keeping the weather out. Unfortunately, as is common, water gets in, sits on
top of that horizontal bit and it rots out. Chop, chop and all the rot comes
out. Once the new inner valance goes in, I can make up the little L shaped bit
to join it all back together.
The paint was still drying at the
bottom of the A post, but I did not have time to add the second part of the
repair, Editor Phil cracked the whip and in the immortal if modified words of
the narrator of Mr Benn, “as if by magic, a deadline appeared”.
This edition’s spend of more than
£600 was primarily caused by the purchase of a rollover frame, as well as a
list of bits picked up at BusFest. You take off the wheels on one side of the
van, make sure there are no liquids like petrol, washer fluid or whatever that
will come out, and then you jack the other side up until the van is lying down.
It will need to be done in a controlled manner but a very nice chap called Neil
Higgins was selling it, and it seemed like a time-saving way to get something I
planned to make next year that will make underside cleaning and detailing a
simpler task.
By the next edition, I aim to
have finished the front, attached the front panel / nose and get Eric on his
side to replace the chassis rails under the cab floor. Maybe Eric will be
snoozing for Christmas. Whatever you are doing between now and then, have a
great deal of fun, my next write-up might be done when full of roast Christmas
dinner!
Yes, it is that time again, winter is very much heading our way. For anyone with a vehicle, VW or not (apparently other vehicles are available!), winter in the UK is the worst time for metal on the roads.
Some suggestions:
Inside
Water
If you have anything containing water, drain it all out. Water tanks, boilers, kettles. Don’t just empty the tank, drain the whole system including the pipes. Remember that water in pipes still expands when it freezes, not just in the tank. It also goes stale after a period of standing. If possible take the tank indoors to keep it above freezing and/or clean it thoroughly.
We use a mild Milton solution to thoroughly clean ours including the impeller that sits in our tank and its associated pipe and electric cable. Then we rinse everything and air dry it all. Other options are available too!
Power
Leisure batteries like ambient temperatures and extreme cold will reduce their operational life. Keep them above freezing by removing them and keeping them in the garage or similar. Remember to keep the electrical contacts in the van safely insulated if applicable.
Keep those batteries charged using a trickle charger that is fit for purpose, which will also prolong their life.
Gas
Butane or propane tanks and bottles should be removed from your vehicle and stored safely with their openings closed properly – don’t leave the regulator open relying on the gas tap on the cooker as these can fail. Now is a good time to weigh them against their empty counterparts to know when you need to change them!
Boring cleaning
Now that you have opened up your van, removed the relevant tanks and bottles, you can get all misty eyed and miss the peace and tranquility of your van by getting in there and cleaning it all. It gives you a great sense of personal achievement as well as going into the winter with a nicely clean kitchen area, the fridge has been bleached and rinsed, and if applicable the bathroom, the shower and maybe the hot tub are all clean. Leave internal doors slightly ajar to keep mould and mildew at bay.
Soft furnishings
If possible, remove curtains, bedding, that emergency woollen blanket from Granny and take them indoors for a good wash or airing.
Ingress
Don’t be tempted to leave doors open or windows more than cracked open. All sorts of miscreants can get in and eat your lovely interior.
Outside
If possible store your vehicle in a garage. If that is not possible, a car port will do a similar job. A breathable cover can be good but make sure it is listed as fully breathable otherwise moist air gets under the cover, rises when things warm up and the vehicle will get wet, holding that wet against the bodywork. Avoid a heavy cover for sure!
Tyres
Tyres degrade from extreme temperatures and long periods of standing still. Winter does that very well! Inspect the tyres, check the pressures and consider putting the van on axle stands if you are not using it for a very long time, taking the wheels into the garage or shed. It also makes theft more difficult!
Moving parts
Lubricate everything. Hinges, moving parts, sliders, mechanical parts. Check the oil level. Use the right lubricant for the part in question. It will pay dividends next year and will keep water away, which is good for the life of the part.
Boring cleaning
Again, give the outside of your vehicle a proper clean, ideally by hand. Dry fully including the fiddly bits inside doors and between panels. Give it all a good quality wax polish. This also keeps water away and prolongs the panels and parts. It also makes you happy as you pass over the cold season when you don’t want to be away.
Underneath
If you are an advocate of underseal and waxoil, get the old visible stuff removed and apply new underseal to dry clean parts. The jury seems out on the benefits of underseal against the downside of it trapping moisture but waxoil or similar applied hot into cavities must be better than not applying it?
Engine
Some texts state to start your engine once a month and run it on idle for 30 minutes. More than that is not necessary and I don’t touch our air cooled engine at all.
An oil change just before the winter alongside a fuel-storage additive in the fuel tank if you like that sort of thing.
Main battery
We leave the main battery connected and the solar panel bolted to the roof of a van in a car port for the leisure battery. If that was not the case, we would trickle charge the main battery once a month over the winter. Again, this just makes sure that you don’t degrade the battery and end up having to replace it all of the time.
The biggest show on the planet in terms of numbers of Transporters attending together. Yes, Busfest is under way. www.busfest.org.
The VW Type 2 Owners Club have their own field. Experience the buzz of the premier event of the year and also return to a tranquil oasis of calm when it all gets too much.
The club have their own marquee complete with complimentary tea and coffee mornings. The marquee is open to all club members and those in their vans and dogs are always welcome. Here is our Chairman with Abbie in the marquee:
This year like last year, we are planning to do evening burgers and morning bacon butties – veggie options available, on a first come, first served basis. Once they are gone, they are gone!
Spend since last report: £313.58.
Total hours labour since last report: 45.5
When I look back through my photo reel for the last two months, I see plenty of progress on Eric. I also see two weeks holiday in Cornwall, the Just Kampers open weekend, Volksweald in Kent, RAF Odiham and some non VW related stuff too. Yes, periodically we have a life, and somehow I also worked.
Last issue, you may have seen that Eric had his roof replaced. The rear right side corner that was purchased over three years ago could not go on before then and that gets spot welded upwards into the roof. Before that I needed to find the line for the corner, so Eric needed the rear arch and since I have no idea what I am doing, I started on the nearside by the sliding door because the rear corner was in, the inner arch was in and the C post by the sliding door was good following my work on it a few issues ago.
The outer arch is a regular replacement as water collects between the inner and outer arches flicked up by the road wheels, rotting the visible edge next to the wheel. The panels available are of variable quality steel and very varied quality fit. My panel came with Eric four years ago and is an old Klokkenholm one of low quality metal and low quality fit. The new ones are apparently better shape and now are
galvanized. It took a while but the original top of that panel was eased off the glued on rubber seal inside, was prepared and the lower edge was set back by a millimetre to allow the new panel to sit flush.
Many clamps later and some minor cutting and hammer tapping, the panel was in and quite close to flush everywhere.
The offside had not fared well and the inner was a mess. After chopping out a lot of it, the old outer was in good enough shape to be used to make a replacement inner. From that panel to the sill on the inside was done with a fabricated section of steel, a great deal of time and a lot of work with the hammers.
Once the inners were finished on both sides they received a great deal of primer! The outer went on easily and showed up the middle panel opposite the sliding door which is now mainly back to bare metal having had a lot of filler. Looks like there was an accident in his past and the bottom twelve inches or so is very dented. Still, I have the new wheel arch panel as a guide line when I get to final prep before painting.
With both arches in, that rear corner has to line up with its wheel arch panel, giving me one line. Getting it on over the D post took a while and some choice words. After about the tenth time, all was lined up and trimmed, clamps were added and that one was welded in too.
Once the inside was welded upwards into the new roof, the top rear corner inside was welded back in and smoothed down. All last little repairs on the inside corners were done and primed as well.
Now the outside was done down both sides and that is a good lift to the spirits.
At the back with both corners in place, the horizontal panels could be offered up that go under the back door and under the engine bay door. The inner panels of both having been replaced or repaired in previous reports. Drilling through good metal and spot welding to good metal is such a lot easier! Again much anti rust paint and thick primer to keep the little rust gremlins at bay for a while.
Under the edge where back door fits was a bit of a fiddly as it is much thinner metal, had been rusty in places and really rather damaged getting the old spreader plate out between the rear doors. It is now metal and broadly straight, but will need a smidge of filler in due course.
Standing back after sanding and priming the rear deck and trial fitting the boot lid made me feel really good. He looks like a bus once more!
Using paint stripper on the rest
of the rear deck I was able to remove the added paint back to the factory white in most places. This was not deliberate as I was aiming for bare metal, but having white instead of brushed black looks better.
With only the window edges to be repaired, everything else behind the front seats is pretty much done. The garage was tidied, swept and Eric was moved backwards into the corner to give me plenty of room to tackle the next part. The front.
Keep using your bus, or working on getting it fixed. Hope to see you in a field soon.
The age old question, which oil. If you have an air cooled engine, the air is cooling the engine, but that is not the end of it. To get the heat out to that air needs a conductor of heat, namely oil.
A thin oil will not transfer the heat and as the heat rises, it becomes thinner, conducting the heat less effectively. Use a top quality mineral oil, Volkwagen recommend 20W50. Ensure that it is topped up to the correct level, checked regularly and that the filter is changed every 3,000 miles.
Add up how much oil you add in between oil changes, an air cooled engine is supposed to burn oil. If you are exceeding 1 litre / 2 pints of oil every 3,000 miles (see the VW handbook which confirms this), then look for visible leaks and smokey exhaust gases. It may be time for a rebuild.
The family show just outside Skegness in Lincolnshire is only two weeks ago, are you going? http://www.vivaskegvegasvw.co.uk/
Lincolnshire’s largest VW show is at Revesby Country Park starting on 16th August 2019. The VW Type 2 Owners Club will be there with the club stand, do come along, say hello and have a natter.
This is a laid back, family oriented classic car show, not a festival!