Spend since last report: £17.55. Total hours labour since last report: 8
Whilst sorting the workbench, I came across a trapezoidal piece of steel with a lip all round, covered in 50 years of muck. It is the steering box strengthener plate that goes between the box and the chassis rail. I had been looking for it last year when I fitted the steering box back onto Eric. Annoyingly, I had put the steering box on, the drag link, greased everything and it looked great.
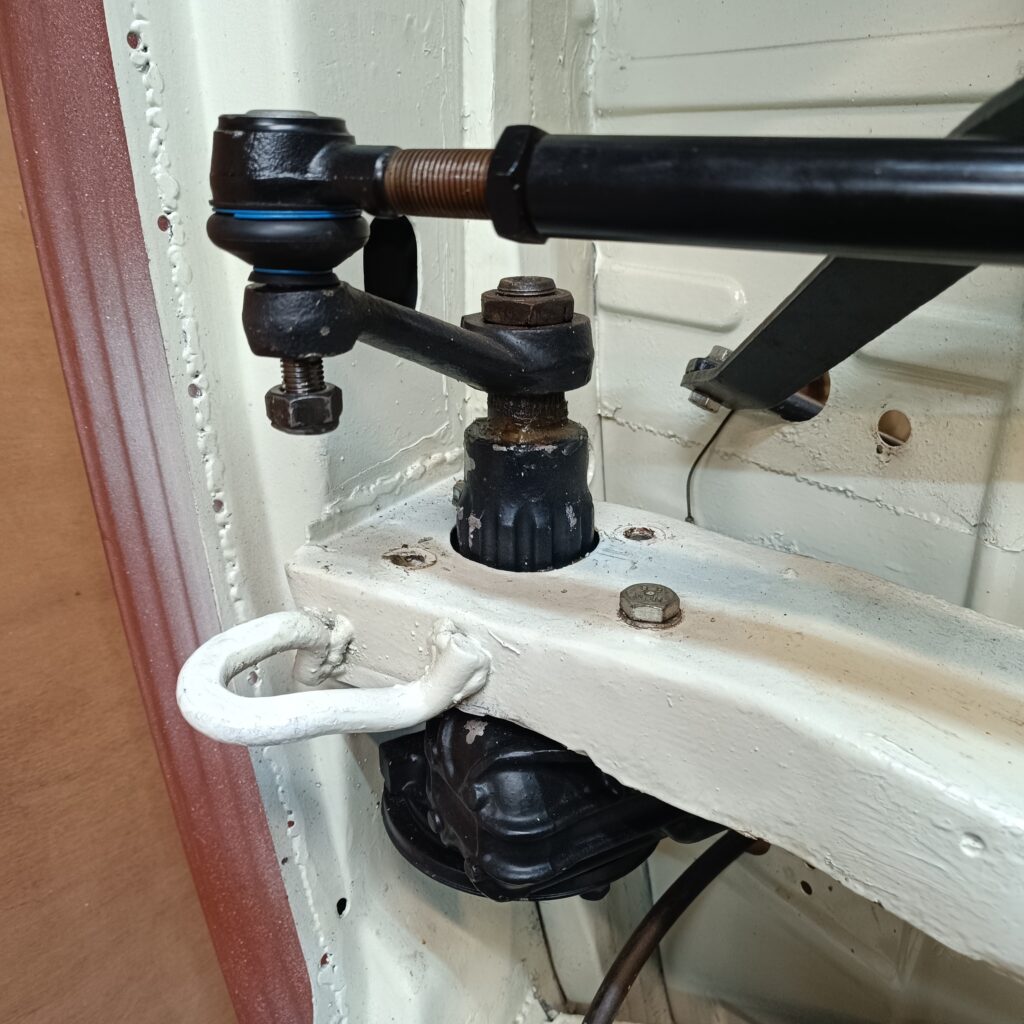
Drag link nut came off easily but the ball joint (top of picture) steadfastly refused to separate from the Pitman arm (arm at an angle under it). After much hammering and swearing, I explained the issue to a neighbour who offered to lend me his ball joint separator, which reminded me that I had one on the tool shelf ten feet from where I had been hitting the ball joint bolt. Oops, silly me.
Once the drag link was off, it is possible to remove the steering box of a late Bay with the Pitman arm still attached, which is a good job as the arm will not come off the box so it is staying there for now! With the steering box on the bench and the strengthener plate being stripped to bare metal for a repaint, I was unhappy with the paint on the steering box so that was stripped again. 3 coats of etch prime and 2 coats of John Deere top paint in matt black to both and they looked great once more.
Seam sealer to the join between chassis and strengthener plate (it is horrendously messy stuff) and reassembly went smoothly. At the same time, since I had the etch primer and the top coat, I grabbed the box of tin ware for the engine and did that as well – I had stripped it last year and rust proofed already. Looks much better.
The brake pedal had been bothering me as I had a return spring that seemed to do nothing – I did my trusty saying “What would Malcolm do?” and contacted him. My spring had snapped, which was why it was doing nothing. JK to the rescue with that and a pack of other bits. The return spring works better when it is complete and after a small fight, it was on. I connected the handbrake cables to the brace bar that also turned up on the bench and then went through all of the suspension and steering nuts, ensuring that each one has the correct washer under the nut. During one enforced rest, I bought loads of washers and a box of drawers to store them. All labelled of course. That was easier than hunting through my assorted basket of bits for random washers and all nuts are now about 18% stronger with the washer added.
The clutch return spring was next, the previous one having never been there. Removing the circlip, the arm, the cup seal and the washer took 5 minutes, cleaning was straight forward but took about 15 minutes to remember where I had put the box of new circlips! Once found it was easy, then empty the whole of the garage of all boxes of parts, work bench, welder and everything else which took ages. Eric went down onto his 2 wheels, the rollover jig came off, new wheels went on the hubs. Those wheels went down as well…fortunately I have spares.
Eric is now on 4 wheels and I can access the front. Next up, prepare the cab for the topcoat – filler, sanding, more primer on top of the current primer, then topcoat in L90D white. The only spend this time was £17.55 on a new spray gun, the old one was about a fiver and has done about 7 years good service but keeps leaking paint out of the nozzle all over the floor. The garage looks like it has measles.
The next morning, I popped into the garage to see Eric and the overnight heavy rain had come in leaving a large puddle under the workbench and the freezer. Ho hum.