A vegetarian option but equally you can substitute the lentils for lamb
Ingredients – serves 4
500 grams sweet potato 1 white onion 1 carrot 1 can of chopped tomatoes 1 cup of mushrooms 150ml red wine 400ml can of lentils, drained Cheese (optional) Butter Herbes de Provence or other dried mixed herbs Stock cube
Chop everything into fairly small chunks. Fry the onion in the butter for 5 minutes. Add the carrots, mushrooms, a teaspoon of herbs, the wine and the stock cube. Simmer for 10 minutes then add the lentils and tomatoes, and cook that all for another 10 minutes.
In a separate pan, add the sweet potato and bring to the boil from cold then drain and mash after 20 minutes. During the mashing, add butter and salt to taste.
Once both pans are ready, spoon the lentil mix into a nice serving bowl, top with the potato and then grate cheese over the top if required.
I don’t know about you, but I am at the age when I need to wear glasses when I read, or anything else when I come to think of it. I love to read for a while in bed especially when I am all snuggled up in our T6 campervan Ginny and this is where the problem starts. It’s easy to pop your book under the pillow and it doesn’t really matter all that much if it slips down the side of the bed, however, where do you put your fragile spectacles to go to sleep? If I had a pound for every time that I have had to get out of the van to retrieve my glasses case and my mobile phone/torch from under the rock and roll bed, I would probably be driving around in a fancy VW California.
In our first van Misty the T25 Holdsworth Villa there was a shelf overhead so you could pop your book, glasses, torch, mobile phone, midnight chocolate supply etc. on it to go to sleep. We do not have this luxury in Ginny and we didn’t want to start drilling holes to fix a shelf and Steve was getting fed up with me waking him up every time I had to lean over him to put my bits and pieces on the work top area. So, what to do?
After trialling all sorts of weird and wonderful ideas including sticky Velcro (not good when you get your hair caught in it – don’t ask!) and with the help of You Tube, I discovered the joys of Magnetic Hooks.
You can buy them in all sizes and weight bearing capability, and if there is a metal base you can move them around the van to suit your needs. If I use them on the outside of the van, I do put a small piece of thin fabric between the metal and the magnet just to protect the paintwork.
We use the Magnetic hooks for a wide range of things including but not limited to:
Hang my glasses and phone bag on at bedtime (yay)
Coat and hat hooks (great for hanging up wet clothing)
Hooks to keep the dog lead on and other dog related apparel
Internal and external fairy light holders (I love a fairy light!)
Shopping bag holder to keep shopping goodies off the floor and away from doggy temptation
Rubbish bag holder
Washing line holder fixed between the barn doors (perfect for rinsing out your smalls)
Securing an old shower curtain to the barn doors for privacy when taking an outside hand shower and perfect for holding the towel and toilet bag.
I can go on, but I think you get the idea. I bought ours from Amazon from the Ant Mag Store and they are called Heavy duty magnetic hooks 36KG (80LBS). As at the date of writing, they cost £15.99 plus postage for 6 though there are certainly deals to be had for different sizes and quantities and other providers of course. As with all these things, read the instructions of use carefully, take care to where you put them, I found that popping one in the middle of the top of sliding door wasn’t a wise move and I wouldn’t attach one to any of my electronics or my mobile phone.
Last issue, Thomas covered the trials and tribulations of getting an MOT. He continues:
By 1999, the van had been well travelled with the family. We had taken it to France a number of times, and a tour of the Irish Republic. All went well on these trips. The only real problem we had was in County Wexford, Eire.
The generator (it’s an alternator on our bus) light came on while travelling on a very hot summer’s day. Having a look in the engine bay, the alternator was so hot you could not touch it. A local small garage was near, so I asked a mechanic to have a look. There was a campsite near, so if we had a real problem, we could camp in the awning we had with us.
The mechanic said we needed a new alternator-without looking! By then, the engine had cooled down. Turning the key, the engine burst into life without the generator light on. Deciding to drive around a bit (the day was still scorching hot) the light came on again a while later. I was not convinced that the mechanics opinion of needing a new alternator was correct without looking or investigating for other faults first. As the light came on after a while, I had an idea. Taking one of the air tubes off the exhaust heat exchanger I used thick foil to create a funnel and wired it up so that the air from the doghouse blew directly onto the alternator body. We drove around locally in case the problem returned. It didn’t come on again, so we continued our trip.
We continued our tour of Ireland and visited all places I had as a child (my family are from Wexford) and a great trip. The kids loved the beautiful beaches and green places in the local countryside. We returned home without incident.
Later when home (1999) my exhaust system had corroded and needed replacement. I seem to have to replace it by every time the MOT was due. JustKampers started to produce more and more new products for T2 vans. They stocked a full stainless steel exhaust system for £118. I thought that this would be good value for money over time. I had no idea that it will still be working well in 2022. So is the alternator I had a problem with. I would say that was excellent value for money.
Using and enjoying the van into the new Millennium, by 2009 I needed to do some serious work on the body.
The front body panel had been patched at a garage some years before. Another hole appeared there, so a good poke about revealed corrosion requiring a more serious repair. Finding that my ‘repairs’ some years before had been nothing more than filler and spray can paint, it had not been welded. Investing in a MIG welder and other tools, I practiced and practiced.
My articles may give the impression that I don’t like mechanics. This is not so. I know some very good ones. It’s just that I developed some knowledge of mechanics myself and simply hate being ripped off. Working hard for my money I don’t want to give it away – I can bodge things myself for a fraction of the cost of a garage doing it. I also hate bodges!
My first bodywork was the inner and outer sill below the opening side door. This went well, and I was so pleased to have the alignment looking good. Best of all the door gaps were good and nothing dropped off. Getting brave, the window rubbers were, well, no longer rubber. Hard black stuff that oozed water when pushed with a finger.
New window rubbers were purchased at Busfest. All except the front windscreen. I had a great plan for that. A seal for a louvre window was purchased. Only because I found one in a hedge! Yes, it’s true. Camping at a non-VW event, I spotted a familiar shape of such a window hanging in a hedge. Retrieving it, it only needed a careful clean. All the glass was there, and the mechanisms worked.
All the window rubbers were cut out. Being careful to use suction handles to hold the glass to prevent unnecessary breakage. This revealed some corrosion as I feared, but not as much as I had expected. Cutting out the bad and letting in new metal all was soon looking well again. The rear window went in easily. Not so the side window rubbers. Asking a windscreen fitter that I came across in the street, he gave me an impromptu teaching session and a tube of screen rubber sealant if I needed it. Even so, fitting the side windows was the hardest work I have done on my bus to date. That is, until I learnt that I needed to be much more forceful with the glass panes than I was. The rubber around the glass needed to slip over the lip of the window opening. Using silicone spray as lubricant (never use washing up liquid, it contains a massive amount of salt) and cord wrapped around the rubber to pull on, each window rubber would almost get in place only to pop out at the last minute. This was so frustrating. I thumped it hard with my arm. Didn’t know glass could bend, but it does. Perhaps I was lucky not to cut myself to pieces and break all my glass, but it went in.
Next on my list were the two front wheel arches. They were a bit crusty. Schofields provided nice German made replacements. Brazilian ones are ok, but a little on the thin side and poor pressings. Still, this is dependent on your budget. Having two full wheel arch panels with steps stored away a few years earlier, I found them out removed them from my stash of bits to set about fitting them.
It is good practice to remove both doors to start fitting them. Being new to this work I didn’t, wanting to keep the doors on to help with alignment and good gaps.
The old sills were cut out. Drilling holes where they are to be separated. By now I owned a compressor and tools. An air chisel makes short work of separating panels. Great noises too.
Don’t think that my van looks amazing and pristine. It isn’t and doesn’t. It is solid underneath and will not leave a trail of rust in the road.
Owning a van is not all about repairs, although a part of it. More fun was to be had in the van before more serious work. There is nothing better than a meal in the evening air, the smell of a BBQ (or six) warming yourself by a campfire and putting the world to rights.
Next time I’ll write how I replaced the vans entire braking system, working at the 2012 Olympic Games in my van, front panel and windscreen replacement and a full engine build on my kitchen table.
Spend since last report: £274. Total hours labour since last report: 72.66
In the 2 months since I last wrote an update about Eric there has been a lot of change. Fortunately, I note what I do each trip to the garage, how long I spend in there and I also document every purchase, just don’t tell Lorna the total! This makes it easier to write it up as I have clear “notes”.
The serpentines arrived – wavy bits of metal that provide the suspension for the seat backs. Initially I used the clips that came with them, but it was all very loose, so each serpentine was welded to the next one. At the sides, I used shortened sections of the serpentines bent to 90 degrees and welded in place as that seems to be how original seats are done – I was able to use the crème brulee torch that I bought about 15 years ago and had never used except for lighting the fire! It all looked fab and received rust proofing paint, primer, and black topcoat. Then I added some plungers purchased online to allow the seat back to lock in place for either driving or camping, sadly I put them in the wrong place and had to do it again the next day!
With the base almost complete, I spent more time on the seat tubs as they have some extra strengthening added for the arms of the seat back. It is starting to look good. I suspect that there will need to be some minor fettling when I get to upholster the base and back, but for now I am calling that section complete.
Following an email chat with a race engine builder in Warwickshire, I put restoration on hold and stripped an engine for the first time. My wife’s 1972 crossover Poppy had an engine replacement in 2015 when the case was found to be split, tipping oil everywhere and the engine had sat in the corner of the garage ever since. I bought a 1776 Mexican case online that was drilled for full flow (external oil cooler ability), but I did not really know what that meant. It took me just over 5 hours to strip the engine from the rockers inwards. From a “long block” and down past the barrels and pistons to piles of engine bits!
Don’t they all look pretty? I set a date with the engineer and toddled off in the rain for 90 minutes to see him, armed with a car full of engine parts from Poppy’s engine and the new case. All he needs to do is build them up into a fabulous engine once I buy the new, larger barrels and pistons. Unfortunately, as with most bits of this restoration, the theory was better than the practice.
The case that I had purchased online was a “good Mexican case” which turned out to have case saver studs, corrosion, had already been align bored and signs of very bad treatment. The drilling for full flow / external oil cooler had been done badly and is for a Beetle – the mounting bar (aka moustache bar) for a Bay window means that those holes cannot be used. Sadly, this is becoming increasingly regular as the cases are old and have not been made since 2014. Never mind he said, I will see what I can do once it is fully cleaned, tested, and measured. Which costs money and might end up as unusable anyway.
Next, we turned to the crankshaft. It has been ground several times and is very worn. He will polish rather than grind and see if it allows it to be used. Which costs money and might end up as unusable anyway.
He looked at the heads and gave them back to me. Totally shot, not even worth trying to resurrect. New heads required. Which costs money.
Finally, he looked at the flywheel. It needs to be 21mm deep between the inner and outer levels and was 20.34mm and the milling to that height had been done badly. New flywheel required. Which costs money.
In summary, I spent 5 hours dismantling an engine and nothing from it is usable. I spent £150 buying a case that is potentially no use either.
More work was done that that, but I will save that for next time. Enjoy your winter whatever you are doing, and I hope to see you at a club event in a field.
The next edition of the club magazine has been finished by our Editors and looks fantastic. It should be arriving through your door soon! If you are enjoying the club magazine and have a story about a trip, an upgrade, a restoration or just a tip, send a contribution to our Editor at editor@vwt2oc.co.uk.
Yes, it is that time again. Hurray! Finally, after the long winter in our non-mobile houses, we can get out our beloved vehicles.
Checklist
Hopefully you all followed the article Time for bed/ to help put your vehicle to bed for the winter. Now that spring is in the air and we are starting to think about getting out and communing in nature, this is a key time to get things ready.
Doors locks – there’s nothing more annoying than a failed lock. get it fixed now before the season really gets going. Door lock issues can be very straight forward but a simple lubrication can be key. Pun intended. A non residue lubricant is best to move the dirt away as WD40 can leave enough gunk to create issues. We favour silicon spray. A little into each lock.
Windscreen wipers – did they perish in the cold winter freezing them to the windscreen. Inspect and replace now.
Water – check the radiator if you have one. Ensure that the bottles that you emptied in the Autumn / fall have no mice, carefully hidden Christmas presents or mildew. Clean with a weak Milton solution if it is drinking water or food related.
Batteries – check the charge on each battery with a good meter. A flat battery can indicate an earth leak. A failed battery needs careful investigation.
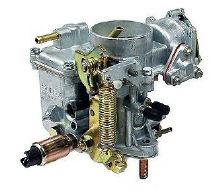
Carburettor – Or equivalent. Check for good operation, no stuck flaps or other deterioration over winter. If you are a professional, this will be straight forward. If you are an amateur, a test drive very close to home will highlight problems! But only after the other checks.
Brakes – your vehicle should roll easily, otherwise this can indicate jammed brakes. Parking in gear for long periods of time can be better for your brake health than a jammed set of brakes. Check the brakes for operation. Check the brake fluid level. If it has been more than 5 years, change the brake fluid as it is hygroscopic and slurps up water incredibly quickly. Water is not a good fluid for applying the brake pads to the disks.
Seals – inspect all door seals for any signs of damage, water ingress or other problems and sort them out now. Glue any loose bits back down with the correct glue.
Windows – ensure that they all open and close fully. Or at least as fully as they did last year if applicable!
Ignition – Once you are feeling confident, get in to your pride and joy and turn on the ignition to number 2. Look at the lights on the dashboard. Check there ARE lights! Are they what you expect / are used to seeing? Have you got fuel (for those with a working fuel gauge)?
Crank it over – don’t expect it to start immediately but things should kick into life within a few seconds.
A little test drive on your driveway will allow you to test the brakes, maybe the steering and other important parts. Softly, softly.
Stay local, take your phone with you and warm clothing. Just in case!
Once you get home, assuming that you have a big smile on your face, make a list of snags, get indoors, put the kettle on and start planning for your summer.
Check out the events page and come and see us at a meeting soon!
Last issue, Thomas covered getting into the scene and enthusing his children with the camper van bug. He continues:
It is always easy to devote time in club magazines such as this, to repairs and breakdown advice, and why not. Being part of the VW ‘community’ has shown me that VW owners are usually so willing to help other VW owners. Much kindness, help and assistance has been offered to me in the past. I was always so grateful, that I now offer the same whenever I can. Part of owning an older vehicle is to resolve problems (I won’t say the word ‘issue’, I hate it, it’s a PROBLEM!), in order to keep using your old vehicle. Having said that, I will talk of problems with my bus, and how they have been resolved. Not forgetting to enjoy them!
My first known mechanical difficulty was when driving from Honiton to Axminster. No sooner had I arrived in the small market town, I noticed the red generator light come on. By this time, I had been made aware that a loud BANG, followed by the ‘Red light of doom’ (the oil light) and the red light of…nearly doom (generator) require immediate action. That is, STOP THE ENGINE ASAP!
As luck would have it, I was right outside a local garage and MOT station, ong gone now to make way for a well-known supermarket chain. Coasting in, I came to a halt at the front door of the garage workshop. Looking in the rear engine bay, the fan belt was on and seemed tight, but when turning the pulley by the fanbelt (careful not to trap your hand) a grinding, crunching noise could be heard. Having worked from the local Hospital for some years and getting to know the local shops and trades, I was unaware of this garage, or if they were good with aircooled VW’s. Not able to move my van and rather stuck, I was forced to seek their help. Luckily for me, I could get to work and take the train home later, leaving the van in the hands of the garage “I’ll get the lad on it”. A worrying sight, as the poor lad looked so new and bewildered by an old aircooled van. He searched for the bonnet. There was none I informed him. “Where is the engine then?” He stares into the rear engine bay in disbelief. Clearly he was lost on this one. I queried the managers wisdom in setting the task of diagnosing my vans problem when he can’t even find the engine. If only my van could be transported home. This was not an option at that time.
The next day I was informed that the fan at the rear of the alternator had disintegrated. I trotted down on foot to visit and see for myself. Pieces of ‘doghouse’ and other components were everywhere. Even though I had not taken my engine apart myself before then (I have since) it looked a mess. The centre part of the fan was missing!
A new replacement fan was required. The garage mechanics were telling me that I needed a new engine. In my view, I had stopped the engine at the moment I heard an unusual noise (the BANG!) and when my warning lights came on. The engine did not stop, I stopped it. Still they insisted. From my early learnings of my van’s inner workings, I was not satisfied with their logic, even though I fully understand I am a self taught mechanic and not a professional. Even fanless, the engine turned and compression felt good. The search was on for a fan. At that time, the supply of VW components was OK, but not as plentiful as available now. A member of Hospital staff knew someone in the town who loved VW’s and ran around in Beetles. Only a nickname and name of a road near the Hospital. Walking up this road I soon found a VW Beetle parked in a driveway next to another under cover. Knocking on the door, it was answered by a young chap. Amused to find an unknown stranger at his door I explained my trouble. What followed was a quick tutorial on his Beetle engine, and a mucky spare fan shoved into my hand with spare nut and shims. This was my first real memory of other VW owners’ kindness. Heading back to the garage I handed the fan to the apprentice mechanic and offered advice where I could. I also carried a Haynes manual in my van which I gave him. My instructions to him and his manager were NOT to order a new engine. Fit the new fan, put it all back together and we will see what happens. Only if it all goes wrong will I consider this option.
A day or so later I called into the garage to see what progress had been made. Just in time to see it fire up and run sweetly. Success! Whilst at home, I looked at my paperwork and found that an MOT was due. Contacting the garage, I asked if they could do this as my van was with them.
The next day I was informed that my van engine was working and an MOT was passed, but my radiator needed urgent replacement. Thinking that this the manager was talking about the oil cooler, I visited the garage again. To my utter disbelief, he insisted that a new radiator was urgently needed, and explained the perils of keeping the cooling system of my engine in good order. I asked the Manager (Snr Mechanic) to show me exactly where on my van the radiator and water-cooling system were located. What’s more, if he can’t find it, I want my MOT fee waived. Not long after I left the garage, only paying for the replacement of fan and work done to expose it and put it all back. I only got outside onto the main road when my light came on again-the fan had undone itself! Leaving it with them AGAIN. On collecting it the next day I was told “To stop it happening again we put a spot of weld on the van to the shaft of the alternator”!!! (Editor – they had failed to install the woodruff key from the sound of it).
From then, I vowed to do whatever I can myself if able.
More trips and camping and diving holidays followed. Great fun. What’s more, I got to sit next to Falmouth bay, after a dive, in the doorway of my VW van supping a coffee and eating a mars bar. A realised dream at last.
This week, we focus on valve clearances on Type 1 engines (Beetle, Split Screen, Bay window and early T25s), courtesy of 2-year club member John Hawthorn and his 1980 Westfalia Bay window. If you have a technical way forward with your vehicle, email editor@vwt2oc.co.uk for inclusion in a future post.
MY EXPERIENCE OF VALVE CLEARANCE SETTINGS AND OTHER MUSINGS by John Hawthorn
I drive a Volkswagen Transporter 2, 1980 Bay Window model with a 1600cc AS series engine. I like to try and do servicing work on the vehicle myself and leave technical, or jobs requiring specialist tools, to the experts. This my experience or musings about setting the valve clearances.
Setting the valve clearances, or tappet clearances, is very important if you are going to get the best performance from your four stroke, pushrod engine. The clearance is to allow for expansion when the engine gets hot. If the clearance is too tight the valves may not close correctly, leading to poor performance, damaged valve seats, a lot of popping and banging through the exhaust or carb, and the engine not running at all because it has no compression. To have the gaps too loose affects the valve timing. The valves will open too late, will not fully open and will close too early. The whole point of the valve timing, which is initially determined by the shape of the lobe on your camshaft and getting the camshaft rotation setting correct, is to maximise the efficiency and performance.
My first experience of tappets was when I was 16. My Triumph Tiger 100, a 500cc four stroke engine, had oil leaks from the pushrod tubes, which I decided to fix. Yes, I am that old. Having passed my test at 16, I was legally able to ride an unlimited sized motorcycle without a crash helmet. I had previously only worked on two stroke engines. I removed the engine head, as you need to do, replaced the rubber gaskets, and rebuilt the engine. I then went for a test drive. The engine popped, banged, and backfired. On my return home I consulted my Dad. Originally, he taught me all I knew – he was my mechanic mentor – and importantly he let me learn by trying to do it. So, when I consulted him, he asked if I had set the tappets correctly. I said “No. I left them at the original setting and just bolted the head back on”. If you strip the top end of your engine, you must set your tappets after a rebuild.
My next experience of setting tappets was on my JAP engine speedway bike. If you know speedway you will recognise that in terms of motorcycle racing it is really a sprint. A race usually lasts less than 70 seconds (even I could beat that) and you start with the engine warmed up and ready. You are not likely to add much extra heat to the engine in a race, and therefore no increased expansion. It was also convenient that the tappet adjustment was on the pushrod end of the valve rocker. Our method of valve clearance adjustment was to get the engine hot then tighten the valve clearance so you could just spin the pushrod with your fingers; practically no clearance at all. A method I am still often tempted to follow if I physically could, but perhaps a bit risky if you are about to set off on a long journey and get the engine really hot!
As I gained more knowledge and experience, my slightly OCD nature started to manifest itself. I looked for tools and devices that would enable me to adjust and tune my engines more precisely. I bought an Engine Analyser, primarily so I could set the Dwell Angle on my ignition points and not rely on feeler gauges to set the points gap. It was at this period that I invested in a Gunson Tappet setting tool. For those who are not familiar it incorporates a screwdriver and socket, as opposed to the screwdriver and ring spanner you would normally use. It also has a torque sensitive micrometre cap. When you wind the cap, the screwdriver tightens the valve clearance. When it clicks the valve clearance is fully closed. By knowing the pitch of the thread on the tappet screw the tool now allows you to “back off” the clearance by clicks to set the correct gap. In practice I found this reasonably successful when leaning over an engine bay on a standard saloon car, but not so reliable lying on my back under a VW T2. I could not trust that the thread did not move as I tightened the lock nut, and I resorted to checking with a feeler gauge anyway. The supposed advantage of the tool, when used correctly is that it should be more accurate. On an old engine, the valve stem may have worn an indentation into the rocker arm in which case the real clearance is between the valve and the bottom of the indentation. As the tool relies on you closing the gap fully and setting it from there, this wear is taken into account. A feeler gauge pushed between the valve stem and the rocker will bridge the indentation and make no allowance for it.
And so, to my recent experience. As part of an engine service, I had reset the valve clearances. I had tried to use the tool but resorted to using a pack of feeler gauges for measuring the gap, a screwdriver for the tappet adjustment screw, and a ring spanner for the locking nut. Three tools and only two hands whilst lying on my back. I had not even bothered to put it on ramps or jack it up. If you have tried this, you will know how clumsy a pack of feeler gauges can be, particularly if you have a mixed metric and imperial pack. As I was about to get under the vehicle once again, I noticed that the screw and nut holding all the feeler gauges was loose to the point of falling off. I thought I had better sort that as I did not want all of the feelers falling over my face onto the ground. Imagine having to sort them back into the correct order (or maybe just buy a new set). Then I had the eureka moment. I did not need the whole pack under the vehicle only the 0.006” or 0.15mm gauge. So, I carefully took them apart, making sure I kept them stored in the correct order, and went back under with only one feeler gauge. Life was much easier.
As it happens this experience fits very neatly with another aspect of my OCD nature. When I carry out a job on my T2, I record the tools I need to do the job. Not just the size of a nut and bolt, but whether a ring spanner will fit, or a ratchet spanner or only an open-ended spanner. Perhaps a socket will do, but is it six pointed / twelve pointed? does it need to be a deep socket? or does it need a slim socket? or even a tube spanner? As I build up my knowledge and database, I can also refine the toolkit I carry on the van. Why carry a full set of ring spanners and sockets if you know you only need half a dozen sizes? My investigation, so far, suggests that the only feeler gauges I need are 0.7mm for spark plugs; 0.4mm for ignition points, and 0.15mm for valve clearances.
OK, I have said it myself a few times, I am slightly OCD but I like to know my vehicle and have the tools I need to hand when I do a job. Does anybody else think the same? Are you interested in sharing the knowledge?
Postscript – Valve Recession
There is a slightly more technical issue that I experienced more recently. On the way to the VWT2OC camp at Petruth Paddocks in April this year, my T2 started to develop some loss of power issues. I could only go so fast; occasionally the engine felt like it had lost power for a moment; and it felt like I was feeling the throttle to keep the engine running at times. On the return journey we broke down a couple of times, but it seemed to start again after a short rest. Eventually we had to admit defeat and call the AA. I had noticed the engine bay was sprayed with engine oil but could not identify the source. The AA patrolman put his finger on the problem very quickly, and quite literally. The fuel pump was shot. The actuator is a rocker arm, driven by a push rod from the camshaft on one side and the other side pressing on the pump diaphragm. The rocker had seized to the pivot pin and, as a result, it had then worn the hole it fits in, thus creating the oil leak and disabling the pump’s efficiency. I replaced the pump, with new gaskets, at home, by removing the distributor cap; then the distributor (having marked the position before hand) – using a 13mm socket and a short extension bar for the distributor; a flat blade screwdriver for the fuel hoses on the pump and a 13mm ring spanner for fuel pump to engine block. I drove around for a few short journeys, and everything seemed fine. The next “trip” was to “The Magic Teapot Festival” near Shepton Mallet. We did not make it. On the M5 I felt the engine die and instinctively knew it was bad. This time neither the AA patrol nor I had any real idea what was wrong. I thought the engine felt a bit hot, but I have no temperature gauge. I was afraid I might have burnt out the valves. The engine has not been converted for unleaded fuel, and I run with Reddex Lead Replacement. At home I tried everything I thought I could do. Then I tested the compression on the engine. Compression on number 2 cylinder seemed very low and number 4 had no compression. I was now seriously contemplating a replacement engine. A couple of days passed and in a last moment of desperation I removed the rocker box covers and checked the valve clearances. None had any clearance at all. All the gaps had closed leaving valves permanently open. So, I reset the valve clearances and the engine was good to go. But why did all the gaps close? Of course, they are likely to close when the engine gets hot, but they should reopen as it cools. Jim, my neighbour then introduced me to a factor called valve recession. This is where the valves recede into the valve seats in the engine head because metal between the valve and head is lost. This has the effect of lessening the valve clearance as the valve stem moves closer to the tappet. It usually happens because of valve edges and seats burning due to overheating. Jim’s theory is that when the fuel pump failed, I was driving according to what the fuel pump would deliver. As I felt for the optimum throttle position, I was effectively running the fastest I could, but with a very lean mix of fuel and air. It was this lean mix that created overheating and started the damage to the valves. I think that ultimately, I will have to take the heads off and inspect the situation. At present it seems OK on short journeys. The important point is that I have no other rational explanation why all my valve clearances closed as they did!
By simply replacing your original dipstick with this Hot Oil Sensor and attaching the 18″ wire (included with the kit) to the oil pressure switch, you immediately begin to monitor your engine’s oil temperature. The oil pressure light at the bottom of your speedometer now serves two functions. Whilst continuing to monitor your oil pressure, it now provides the data from the Hot Oil Sensor as well. If your engine oil reaches 225 degrees Fahrenheit (107 degrees Celsius) the light will begin to flicker, indicating that you are approaching an unsafe operating temperature. Simply reduce your speed and the light will typically stop flickering, indicating that your oil temperature has fallen to a safe operating temperature once again. If your oil temperature continues to rise to 235 degrees Fahrenheit (113 degrees Celsius) the light will remain on solid. This is the temperature at which you should pull over, in order to investigate the issue.
The Hot Oil Sensor was created by Harold Brown in the late 1960s and remains virtually unchanged since the first one was offered for sale, over 50 years ago. Works in all air-cooled engines and is available from main stockists – and members, don’t forget to get your club discount!
Steve Tatner has another gadget called a Ridge Monkey, to go with his Frontier stove from last issue. He writes:
Michelle discovered these a few years back and have taken them with us ever since. They were originally designed for anglers, cooking while fishing by the riverbank.
They have removable magnetic handles which hold the top and bottom of the two pans together.
They are great for when cooking in the van, for instance when frying burgers, you have no need to try and flip the burger, just turn the pan over, its enclosed which stops oil and fat spitting everywhere inside your bus. The medium sized pan also has compartments which is very useful. They are dead easy to clean.
The Ridge Monkey range includes a toaster, thermos mug and water bottles with cooking pans complete with utensils starting at £20.