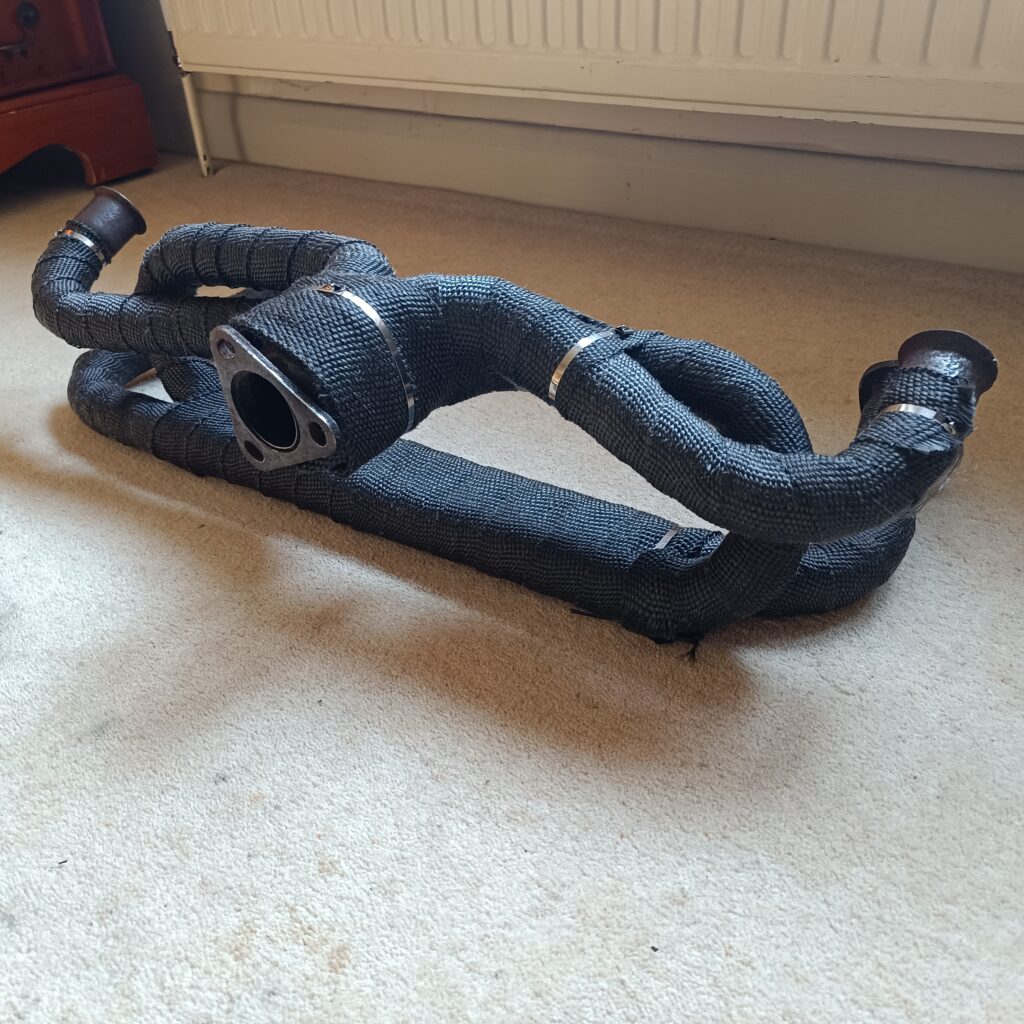
This issue’s gadget is “exhaust wrap” or “exhaust bandage”. Engines get hot – air cooled or water cooled, it doesn’t matter – there is heat being generated from the combustion of fuel and getting the heat away is a key part. With the exhaust being in close proximity to the engine and the by products coming out of the exhaust, it naturally gets hot and the radiating effect means that anything nearby is heating up.
The bandage wrap acts as an insulator, keeping the heat inside the exhaust, thereby keeping the heat away from around the engine. Even if it is only a small benefit, it is a benefit. It also looks nicer than a slightly rusty exhaust manifold.
The wrap is easily available from motor factors and online and costs between £10 and £20, there are a lot available and most comes with metal ties to make a neat job.
Removing the exhaust manifold is optional but was done on this one as the engine was out of the vehicle. Starting at any end, start wrapping the bandage around the manifold tightly trying not to get too many layers on any section. As you get to a suitable point, use one of the ties to stop it unravelling – the start will be kept in place as it is under the next row BUT it is easy at this point to tie that one off as well for completeness. You can wrap it as neatly as you wish, you may as well use all of the ties that come with it.
Some of them are glass fibre or have other heat retardant materials that can make your hands itch, so take suitable precautions.
Spend since last report: £17.55. Total hours labour since last report: 8
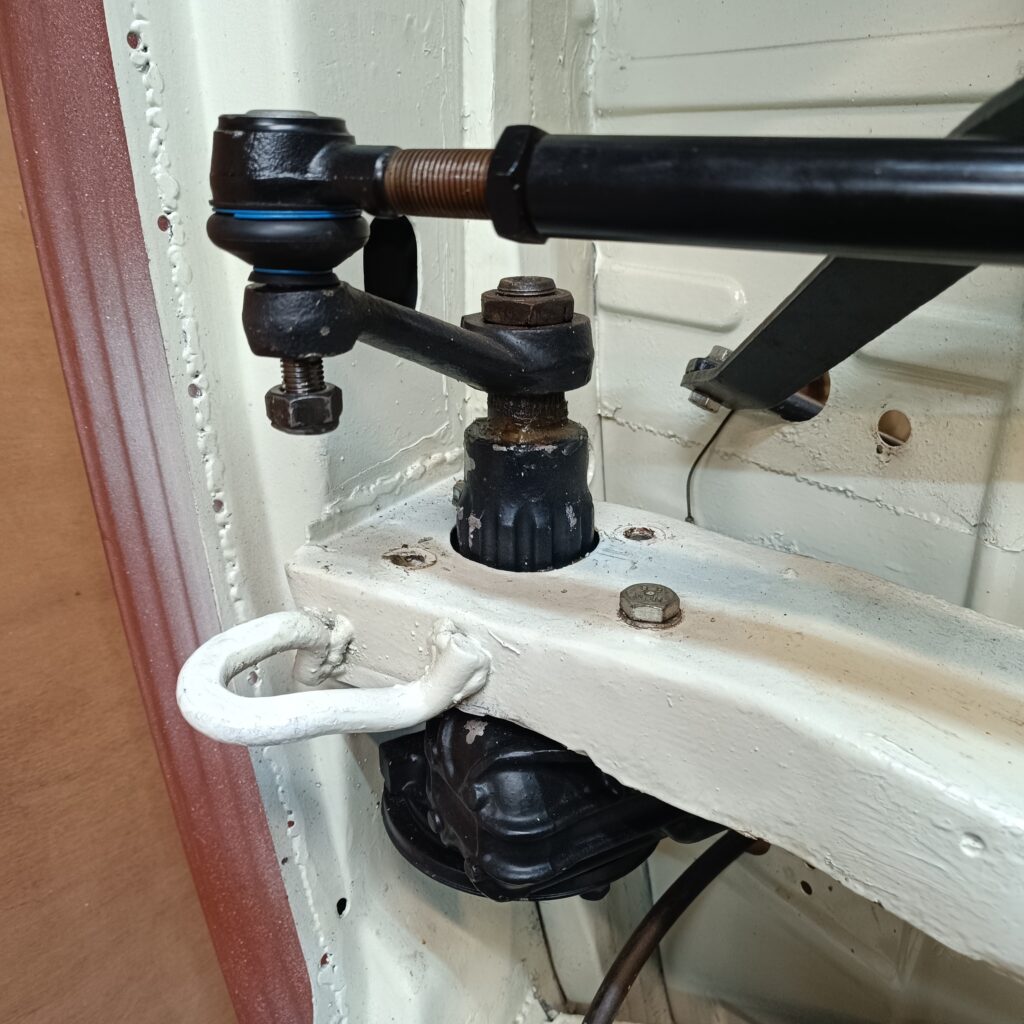
Whilst sorting the workbench, I came across a trapezoidal piece of steel with a lip all round, covered in 50 years of muck. It is the steering box strengthener plate that goes between the box and the chassis rail. I had been looking for it last year when I fitted the steering box back onto Eric. Annoyingly, I had put the steering box on, the drag link, greased everything and it looked great.
Drag link nut came off easily but the ball joint (top of picture) steadfastly refused to separate from the Pitman arm (arm at an angle under it). After much hammering and swearing, I explained the issue to a neighbour who offered to lend me his ball joint separator, which reminded me that I had one on the tool shelf ten feet from where I had been hitting the ball joint bolt. Oops, silly me.
Once the drag link was off, it is possible to remove the steering box of a late Bay with the Pitman arm still attached, which is a good job as the arm will not come off the box so it is staying there for now! With the steering box on the bench and the strengthener plate being stripped to bare metal for a repaint, I was unhappy with the paint on the steering box so that was stripped again. 3 coats of etch prime and 2 coats of John Deere top paint in matt black to both and they looked great once more.
Seam sealer to the join between chassis and strengthener plate (it is horrendously messy stuff) and reassembly went smoothly. At the same time, since I had the etch primer and the top coat, I grabbed the box of tin ware for the engine and did that as well – I had stripped it last year and rust proofed already. Looks much better.
The brake pedal had been bothering me as I had a return spring that seemed to do nothing – I did my trusty saying “What would Malcolm do?” and contacted him. My spring had snapped, which was why it was doing nothing. JK to the rescue with that and a pack of other bits. The return spring works better when it is complete and after a small fight, it was on. I connected the handbrake cables to the brace bar that also turned up on the bench and then went through all of the suspension and steering nuts, ensuring that each one has the correct washer under the nut. During one enforced rest, I bought loads of washers and a box of drawers to store them. All labelled of course. That was easier than hunting through my assorted basket of bits for random washers and all nuts are now about 18% stronger with the washer added.
The clutch return spring was next, the previous one having never been there. Removing the circlip, the arm, the cup seal and the washer took 5 minutes, cleaning was straight forward but took about 15 minutes to remember where I had put the box of new circlips! Once found it was easy, then empty the whole of the garage of all boxes of parts, work bench, welder and everything else which took ages. Eric went down onto his 2 wheels, the rollover jig came off, new wheels went on the hubs. Those wheels went down as well…fortunately I have spares.
Eric is now on 4 wheels and I can access the front. Next up, prepare the cab for the topcoat – filler, sanding, more primer on top of the current primer, then topcoat in L90D white. The only spend this time was £17.55 on a new spray gun, the old one was about a fiver and has done about 7 years good service but keeps leaking paint out of the nozzle all over the floor. The garage looks like it has measles.
The next morning, I popped into the garage to see Eric and the overnight heavy rain had come in leaving a large puddle under the workbench and the freezer. Ho hum.
The next edition of the club magazine has been finished by our Editors and looks fantastic. It should be arriving through your door soon! If you are enjoying the club magazine and have a story about a trip, an upgrade, a restoration or just a tip, send a contribution to our Editor at editor@vwt2oc.co.uk.
Yes, it is that time again. Hurray! Finally, after the long winter in our non-mobile houses, we can get out our beloved vehicles.
Checklist
Hopefully you all followed the article Time for bed/ to help put your vehicle to bed for the winter. Now that spring is in the air and we are starting to think about getting out and communing in nature, this is a key time to get things ready.
Doors locks – there’s nothing more annoying than a failed lock. get it fixed now before the season really gets going. Door lock issues can be very straight forward but a simple lubrication can be key. Pun intended. A non residue lubricant is best to move the dirt away as WD40 can leave enough gunk to create issues. We favour silicon spray. A little into each lock.
Windscreen wipers – did they perish in the cold winter freezing them to the windscreen. Inspect and replace now.
Water – check the radiator if you have one. Ensure that the bottles that you emptied in the Autumn / fall have no mice, carefully hidden Christmas presents or mildew. Clean with a weak Milton solution if it is drinking water or food related.
Batteries – check the charge on each battery with a good meter. A flat battery can indicate an earth leak. A failed battery needs careful investigation.
Carburettor – Or equivalent. Check for good operation, no stuck flaps or other deterioration over winter. If you are a professional, this will be straight forward. If you are an amateur, a test drive very close to home will highlight problems! But only after the other checks.
Brakes – your vehicle should roll easily, otherwise this can indicate jammed brakes. Parking in gear for long periods of time can be better for your brake health than a jammed set of brakes. Check the brakes for operation. Check the brake fluid level. If it has been more than 5 years, change the brake fluid as it is hygroscopic and slurps up water incredibly quickly. Water is not a good fluid for applying the brake pads to the disks.
Seals – inspect all door seals for any signs of damage, water ingress or other problems and sort them out now. Glue any loose bits back down with the correct glue.
Windows – ensure that they all open and close fully. Or at least as fully as they did last year if applicable!
Ignition – Once you are feeling confident, get in to your pride and joy and turn on the ignition to number 2. Look at the lights on the dashboard. Check there ARE lights! Are they what you expect / are used to seeing? Have you got fuel (for those with a working fuel gauge)?
Crank it over – don’t expect it to start immediately but things should kick into life within a few seconds.
A little test drive on your driveway will allow you to test the brakes, maybe the steering and other important parts. Softly, softly.
Stay local, take your phone with you and warm clothing. Just in case!
Once you get home, assuming that you have a big smile on your face, make a list of snags, get indoors, put the kettle on and start planning for your summer.
Check out the events page and come and see us at a meeting soon!
No doubt my fascination with cars comes from my father, who has owned many interesting vehicles over the years, ranging from an Austin A35 to various Renaults and BMWs (including a 2002 Tii and a 635CSi) as well as a Jaguar XJC.
My first exposure to air-cooled VWs was in my late teens when my best friend owned a ’70s beetle. Although not particularly sporty, I was impressed with its reliability and seemingly unburstable engine. One summer we bought 2 beetles from a scrapyard for £30 (yes £30!) and made ourselves a very rudimentary VW dune buggy to race around a friend’s parent’s farm. It was absolutely terrifying but great fun, nevertheless!
Over the years I’ve owned several Mk 2 Golfs, a particularly nice Mk 1 Scirocco Storm (that I still miss to this day) and have also built several kit cars. However, I’ve always had a longing to own an air-cooled VW camper and so, about 10 years ago, I bought myself a copy of Hayne’s ‘Volkswagen Bay Transporter Restoration Manual’. Whilst this is an excellent book, I must admit that it slightly put me off the idea of owning a T2, as 90% of the contents seemed to relate to rust repairs! However, despite the rather gloomy picture painted by the Haynes manual, my ‘itch’ to own a T2 didn’t go away.
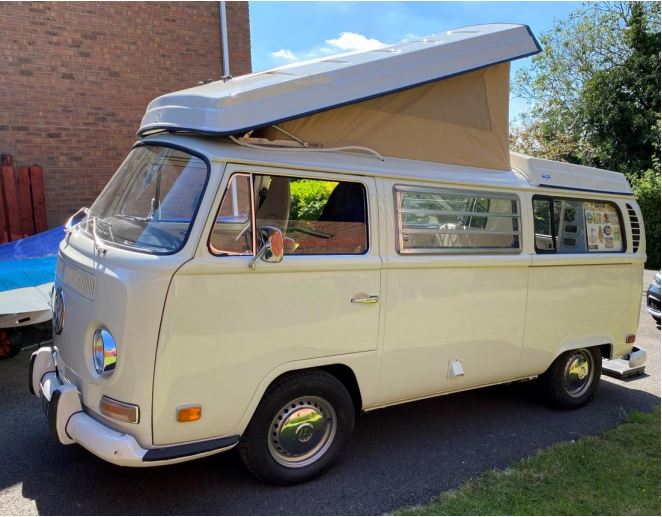
In 2018, I spotted an advert on eBay for a 1970 VW Westfalia Camper that was described as a California import and rust-free. The T2 was quite local so, with the rust repair sections of the Haynes manual foremost in my mind, I decided to look and see if it really was corrosion free. To my complete surprise, it was ‘as described’ with no significant rust but with plenty of work still required to get it roadworthy again. The owner had previously restored a VW split-screen bus and, knowing the time and money it takes, had decided to sell the Westy given his young family and imminent plans to move house.
So later that evening, I casually mentioned this rust-free T2 that I’d spotted on eBay to my wife, Cate. Fully expecting a firm ‘NO’, I was pleasantly surprised to hear that she also had a secret desire to own a ‘cute’ old VW Camper one day. After some nail-biting and frantic bidding on eBay, we won the auction and ‘Henning’ the Westy was finally ours!
I managed to borrow the works pickup and trailer and collected Henning the very next weekend. After clearing a suitable space in the garage, we came across our first major problem; Henning was slightly too tall for our garage doors! After some head scratching, we decided to remove the pop top and let some air out of the tyres and, hey presto, Henning was safely inside. A major expense over the coming year was some rather smart (but expensive) taller garage doors. I consoled myself by the fact I had always fancied electric opening garage doors and now I had the perfect excuse to buy them.
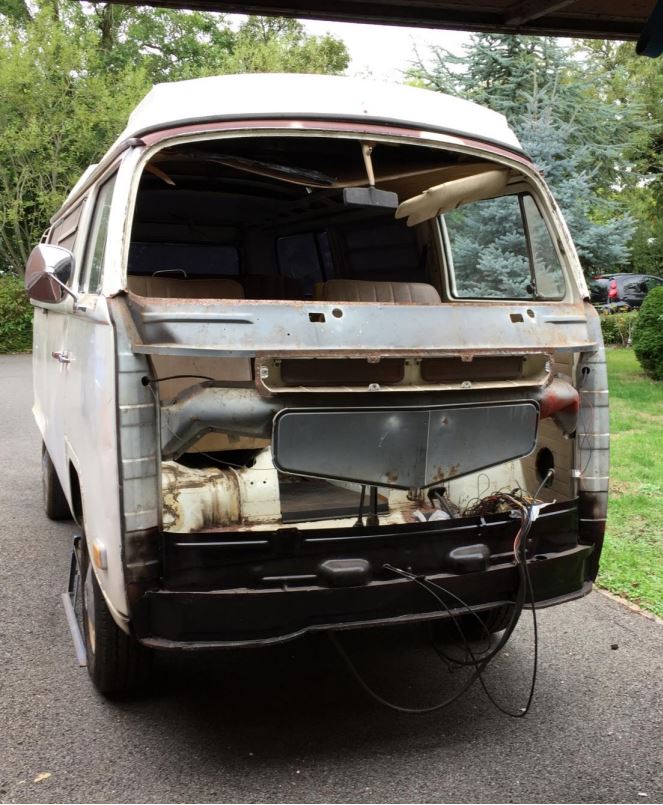
Henning was in a very sorry state when we got him, with no front panel (the original panel apparently being badly dented by the spare wheel), a bump to the rear offside corner, and the dashboard and engine having also been removed.
The interior was also in a very bad way and had obviously been a comfortable home to various creatures over the years. After Cate declared she was “never going to go camping with that old interior,” we decided to remove and sell it on eBay. I had initially thought that we would be lucky to find anyone interested in just taking it away, let alone paying money for it. However, I was amazed at the interest (and bids) it generated, I had obviously badly under-priced it!
Ingredients – Serves 2 1 pack of about 8 chicken drumsticks 2 green chillies 2 red chillies 2 tablespoons of Balsamic vinegar 2 tablespoons of lemon juice / 1 lemon juiced 1 tablespoon of honey Some dried mixed herbs
Yes, dried mixed herbs again – a staple in the camper van! Using a sharp knife, slice across the flesh of the chicken down to the bone to allow the spices to penetrate. Add all of the ingredients to a flat dish and get the drumsticks coated. Leave them to marinade for at least 30 minutes but overnight is even better. Wrap the drumsticks in foil but don’t stack them then either cook in a frying pan or on the BBQ tipping the leftover marinade from the dish over the top of them. Cook thoroughly! For adding wow factor, add a little lemon juice and some fresh green herbs on top as you serve them alongside crusty bread and salad. And a glass of something of course!
Some people like a TV in the camper van for those longer, darker evenings when there is no club marquee to sit and natter. Others like it for specific events such as Wimbledon (which we put on the club TV by the way).
Another option instead of the TV is to use a portable projector. James and Marina Reeves, part of our supportive management team introduced us at a recent event to the Anker Nebula capsule, miniature projector. Just 6 inches / 15 cm high, this little cylinder has a built in battery that lasts 1.5 hours in standard mode and up to 4 hours otherwise. At 200 ANSI lumens, it does really need a dark evening but can project an image from its tiny cylinder onto any flat surface – a 40 inch (1 metre) diagonal picture from 4 feet away (1.14m) up to a colossal 100 inch (2.5 metres) diagonal picture when the surface is 3 metres / 10 feet away. We tried it on a planked shed and it looked incredible.
You can stream anything from YouTube and Netflix, plug in a USB stick with movies on it, there is even a remote control!
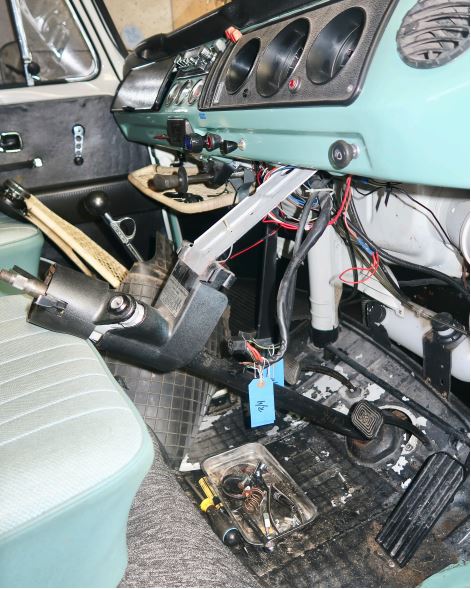
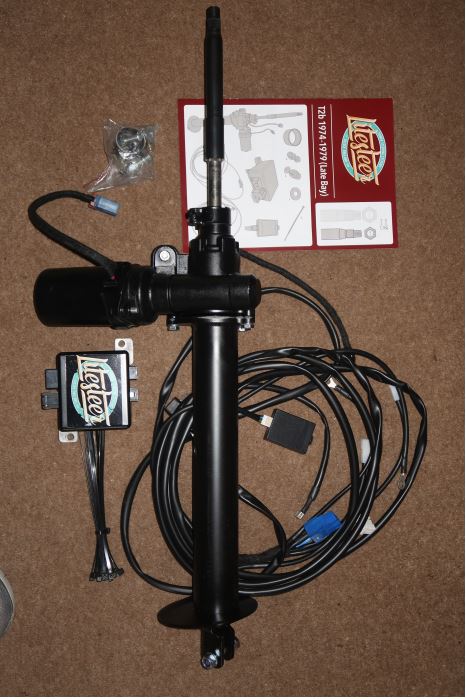
After talking to Nick at the AGM, I told him that I was fitting a “Litesteer” to my 1979 late bay, he suggested it would be a good article for the magazine. The Litesteer kit is not the cheapest but on delivery, the quality of the kit I received was very good, and the instructions easy to follow. Plus a 10% club discount was a bonus!
The parts and harness are of top quality and made to last. First job was to remove the old steering wheel column, disconnect the battery and remove the pedal cover.
Next remove the kick board, rubber mats, disconnect wiring, remove steering wheel and disconnect the column from the steering box.
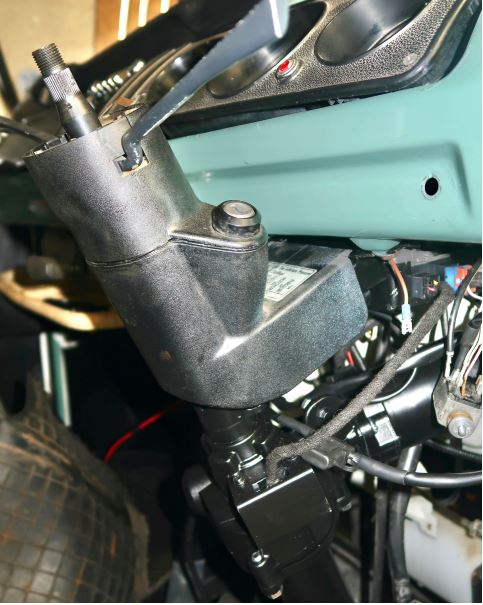
Next the column needs to be cut, using the spacer this give you the exact position to cut the column to ensure it fits without error. The plate then needs drilling to take the ECU, fitting the new unit was easy.
Next run the harness under the van to the battery and connect to the positive terminal, follow original harness and clip to it. Plug in four connectors to the ECU and one to the light switch.
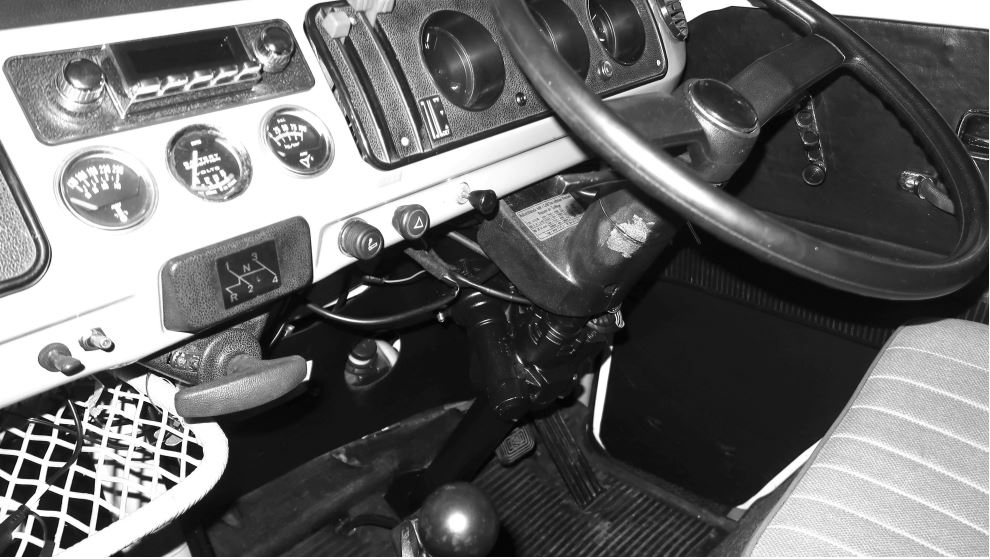
Connect battery to earth and you are ready to go. I could not believe the difference it has made, it is like driving a new modern car, Baldrick is better than any T6 VW camper. With its 2000cc Type 4 engine and twin choke Webber, large sump oil cooler it makes a very good tow bus.
The whole process takes only a few hours with the box of parts costing between £834 and £1,194 depending which vehicle and they will fit it for £300 extra. Remember that you can get 10% off as a club member!
Another option instead of the Litesteer is a package available on eBay for £295. This also takes a few hours and needs the steering column cutting but this package does need a small amount of welding of the steering column as well plus a bracket to stop the column from twisting. Just search eBay for “Bay window power steering”.
(or… How I tried to turn my T2 into a mobile Cathedral)
It happened in Oxford. Very fitting for the start of an ecclesiastical undertaking. My wife Lindsay and I had stopped for a weekend sojourn among the dreaming spires on our way to the Isle of Wight for a VWT2OC summer meet. It was June 2021.
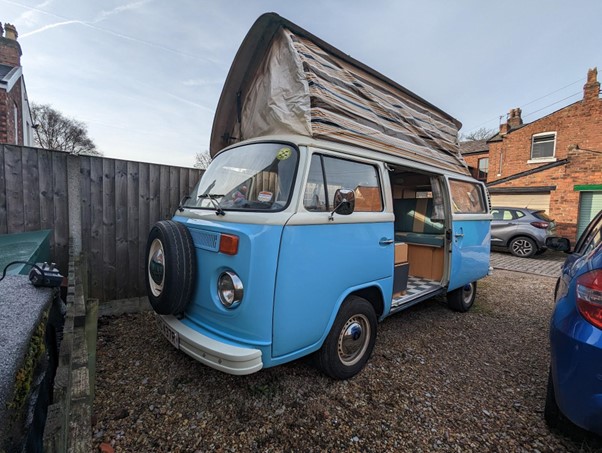
Our recently acquired 1976 Devon Bay Conversion (affectionately known as “the camper”) had let us down twice: in the same place on the M65, trying to get to Orcaber Farm campsite at Settle (highly recommended btw). Brakes seized on all wheels. Turns out it was the servo, which our local champion “The Slambassador” duly replaced. So we were nervous of such a long journey from Liverpool, and split the route in two.
On the second night Lindsay had gone to the shower block and I was up in the roof space making the bed. And then all of a sudden I wasn’t. I was on the floor of the camper with halves of a broken bed in splinters around me. If it hadn’t been for the movable seat/storage cupboard directly underneath, our poor dog Toby would have been flattened. As it was, he stared at me in a mixture of shock and disappointment.
We slept on the rock’n’roll bed for the rest of the trip. Examination of the bed boards revealed that they were made from something similar to a pound shop picture frame stuffed with egg boxes and covered with hardboard. Hardly sufficient to support my ever increasing bulk and that of my not insignificant other. Small children perhaps, or Ken and Barbie, but not big kids. So, I went to our local timber merchant and had a couple of pieces of 18mm plywood cut to size. Not even the elephant in the room would be able to destroy that! And so it remained: strong and reliable, but also plain and wooden, until our first successful trip to Orcaber Farm.
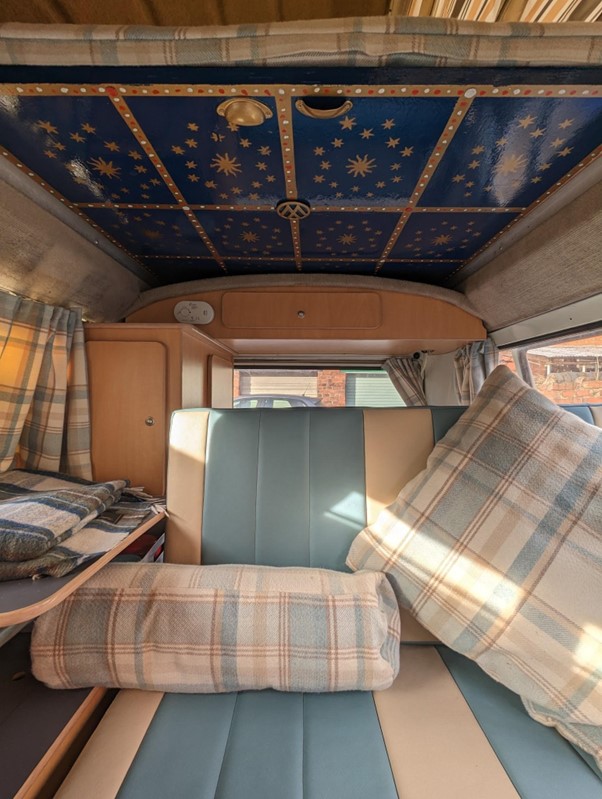
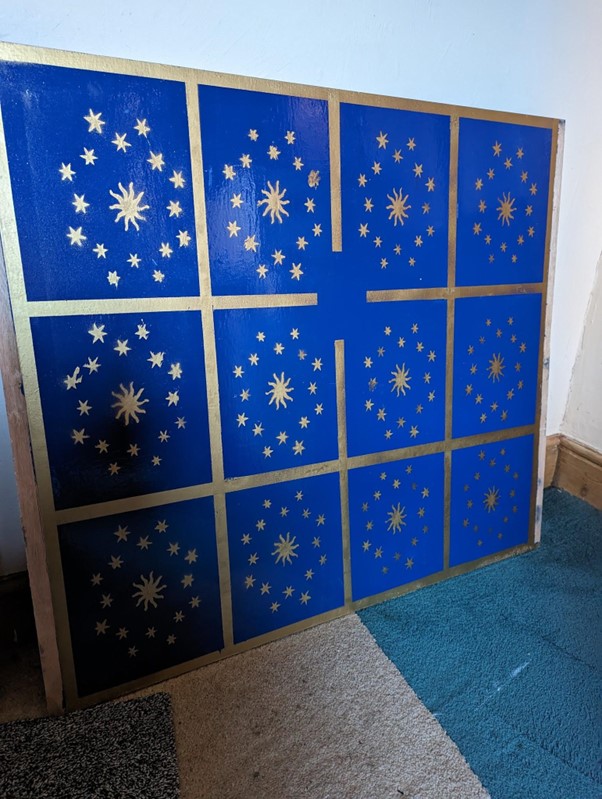
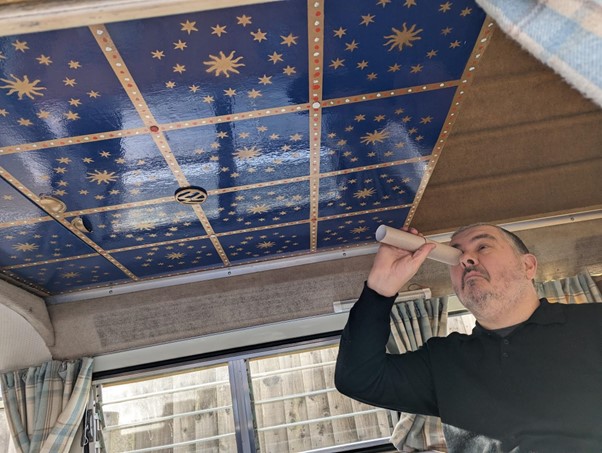
We took the Settle to Carlisle railway, entertained on the way by a group of Dutch tourists who were slightly tipsy but great company. We decided to experience the atmosphere in the Cathedral to full effect by attending a short service with choir. And it was looking up at the awe-inspiring ceiling inside the Cathedral, as we listened to spiritually uplifting song, that I got the idea to paint our bedboards in the same pattern. Deep blue with golden heavenly bodies and red and white adornment. Eighteen months later, the job hadn’t started. Amazon were fresh out of tuits, round or otherwise. It was a project for the future.
And then I turned the telly on one day, happening to catch an episode of “George Clarke’s Amazing Spaces”. George was having a caravan bespoke built by a team of artisans and professionals, and guess what design he was planning for the ceiling? A facsimile of Carlisle cathedral! I had a Victor Meldrew moment, and then I was spurred into action.
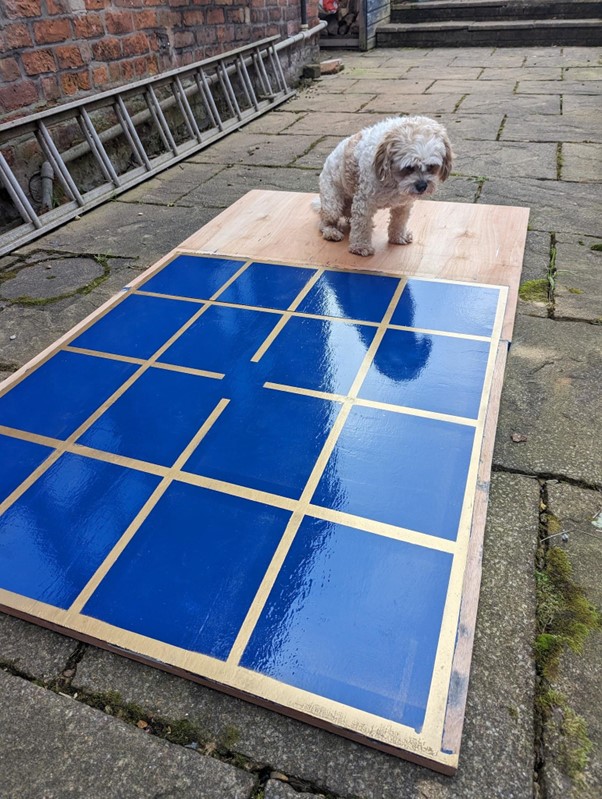
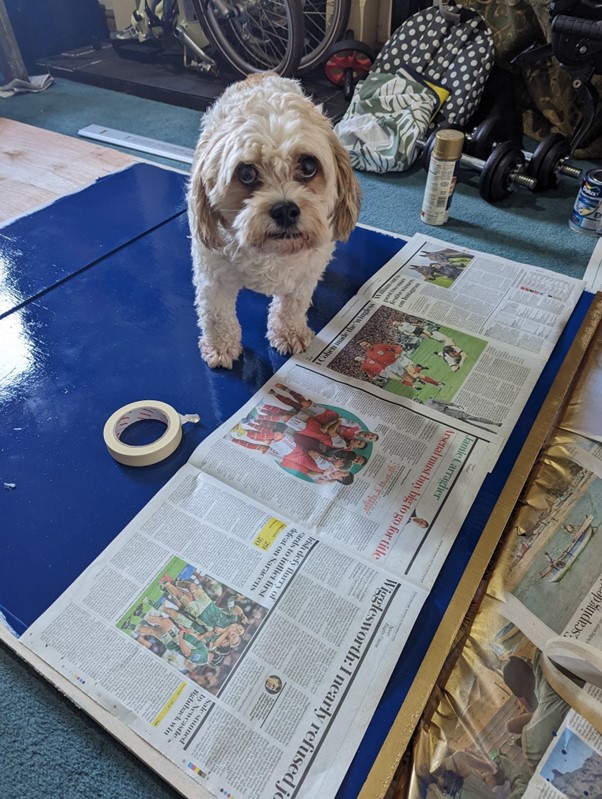
There was half a tin of gloss (coincidentally called “Oxford Blue”) left from when I had repainted the front door, and a can of gold spray paint that had been buried for years somewhere in the shed. Armed with rolls of masking tape and some acrylic primer, I set about my grand design. Toby gave discerning looks and barks, and tried to put his own pawprint on proceedings while the paint was wet. Together we got the job done.
I haven’t dared to watch any more episodes of George Clarke. I’m sure his design will be more elaborate, more ornate and very much more expensive, and I’m not going to give him the opportunity to rub my nose in it. But I am very happy with the result, and hope you like it too. I’m thinking of turning the sink into a font next, and maybe the under-bed storage into a crypt. What do you reckon?
Well, what a time. For those of you who have not attended, why not? A great weekend of seeing some wonderful VWs and all sorts of modifications. Over 200 traders, plus people doing a little garage clearance. Plenty of bargains to be had, nice people to meet and the opportunity to put faces to, not only some of the names mentioned in this august publication, but also the dealers you are in contact with. Plus some wonderful scenery!
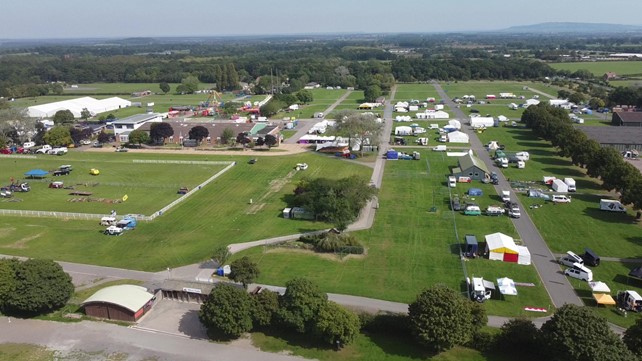
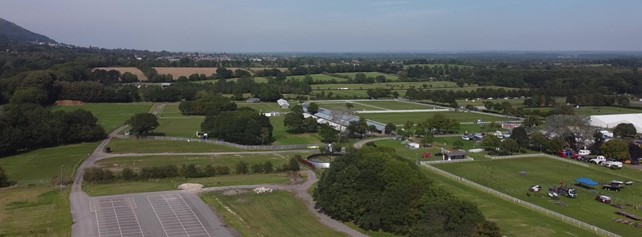
In short, three days of catching up and making wish lists. Or is it? (cue dramatic music) Well no, obvs! Despite it being a working showground some people were there 3 weeks before the opening day. Lots of jobs need doing. Firstly, we’re expecting something like a thousand people to camp. That includes tents, VWs, caravans, in fact anything you can think of including at least 2 tear-drop trailers! So we need electrical hook ups for some of those pitches, especially the disabled pitches. Then we need to mark out the rest of these fields, plus another 7 behind me.
Don’t think it’s all about the camping though! There are fences to build around the arena and staff only areas. Then there’s the traders’ areas. When we turned up there was about a week to go and there were already 4 or 5 club members there, plus Lynn and John the camping co-ordinators, actually they seemed to be everywhere 24/7!! I don’t know where they found the energy.
Sunday afternoon on of the hottest days of the year and we’re out on the fields marking out the first pitches. Gunther and family, denominated “The Northfield Crew”, where already working hard too having some 7/8 fields to cover. But as they’ve been coming here for 23 years (as I recall) they definitely know exactly what they’re doing, and novices like us will only slow them down!
Anyway, the next 5 days consist mainly of measuring 7m squares in the blazing sun. It didn’t take some of us long to go “continental” and start earlier, take a long lunch and get back at it in the late afternoon, and, in that heat putting up marquees meant working in the shade for about half an hour (such are the simple pleasures in life!)
This will become the traders’ area!
There was still loads of other stuff to do too, Laura was lucky enough to be given inside work that meant air con! Good but simple food was provided to the volunteers for three meals a day. But the most rewarding part of it all was watching it all come together!
The gates opened Friday morning and people came from ALL directions! Fields filled, families staked claims on adjacent pitches, but importantly, all fire roads were left clear despite our fears that some might become “private” gardens. One thing I noticed, that despite pitches being well marked, due to the heat people headed for shade whenever they could, including hiding the bus in the trees at the side of some of the roads!
The real benefit of all the hard work was being able to help people when difficulties raised their heads. As an example, Marina Reeves also volunteered, and she was approached by a lady and her young family who had found the pitch she had chosen was now next door to a group of young men being overly exuberant. Marina, having more knowledge of the site was able to swiftly find her a quieter pitch. This single act was enough to confirm the usefulness of volunteering and the benefits of marshalling.
I, too, was able to help later on when a chap approached me looking for a pitch. The field he was in had several “reserved” pitches in it and by quickly asking about I found not one but two pitches where all attendees were present but extra spaces where “baggsed”! When this was discovered, families involved were very helpful and apologetic about their oversight.
As I said earlier, the show itself was a great event, the traders seemed to have both enjoyed it and traded well, so it was worthwhile. The bands where great, at least two each night, plus the disco, VDub Radio, and fair adding to the atmosphere.
As Sunday evening approaches, everyone is packing up ready for the off, with most traders packed and leaving the site by 5pm. This means that the campers are also getting ready to depart by tea-time. So, by mid-morning we’re starting to pull up all the little pegs we so carefully hammered in! Winding up the tape that defined the edges and “no-go” areas, such as emergency gates that are closed.
We forget such things as the “fire stations” that need to be distributed and collected, the bins that were, pretty much, on every corner. Plus the marquees now need to come down and be packed away again! I can honestly say that while it was, at times, hard work it was also great fun. And personally, I found it quite a bonding experience. Would I do it again? At the drop of a hat!! Looking forward to next year, if Lynn will have me!!! and I hope to see some more of you there both as volunteers and on the club field!!
Editor Nick says – Thanks Bill for another great write up. Anyone who wants to attend Busfest during the build up week and work for their entry ticket, please contact Maggie on secretary@vwt2oc.co.uk who can pass your details to the Busfest team for inclusion in this year’s group.
On an unrelated note, at Busfest 2023 in the VWT2OC club field on Saturday evening, we were delighted to have our very own Lorna singing for us. Sadly, she was also talked into a duet with Editor Nick on the alternative lyrics to The Beatles’ “Help!”, dedicated to our wonderful Chairman and guru of all things mechanical, Mr Malcolm Marchbank. We hope that he is still talking to us after that.
We sang:
Help! I need a Malcolm Help! Not just any Malcolm Help! You know I need you Malcolm Help! When my van was younger, so much younger than today She never needed anybody’s help in any way But now these days are gone and we’re not so good at stuff Now I find I’ve lost my mind, I’ve opened the engine door Help me if you can, I’m feeling around And I would appreciate you coming ’round Help me get the circuit to hit ground Won’t you please, please help me? And now my van has changed in oh so many ways My van it seems to vanish in the exhaust haze But every now and then the steering is quite poor I know that I just need you cos it’s never done that before Help me if you can, I’m feeling around And I would appreciate you coming ’round Help me get the circuit to hit ground Won’t you please, please help me? When my van was younger, so much younger than today She never needed anybody’s help in any way But now these days are gone and we’re not so good at stuff Now I find I’ve lost my mind, I’ve opened the engine door Help me if you can, I’m feeling around And I would appreciate you coming ’round Help me get the circuit to hit ground Won’t you please, please help me? Help me, help me, oh no….