Volkswagen Type 2 Owners Club – The VW club for all Type 2s!
Category Archives: T4
Always trying to stay ahead of the curve, the T4 used all the automotive design enhancements that had occurred in the last 10 years. The very essence of Volkswagen usability.
The next edition of the club magazine has been finished by our Editors and looks fantastic. It should be arriving through your door soon! If you are enjoying the club magazine and have a story about a trip, an upgrade, a restoration or just a tip, send a contribution to our Editor at editor@vwt2oc.co.uk.
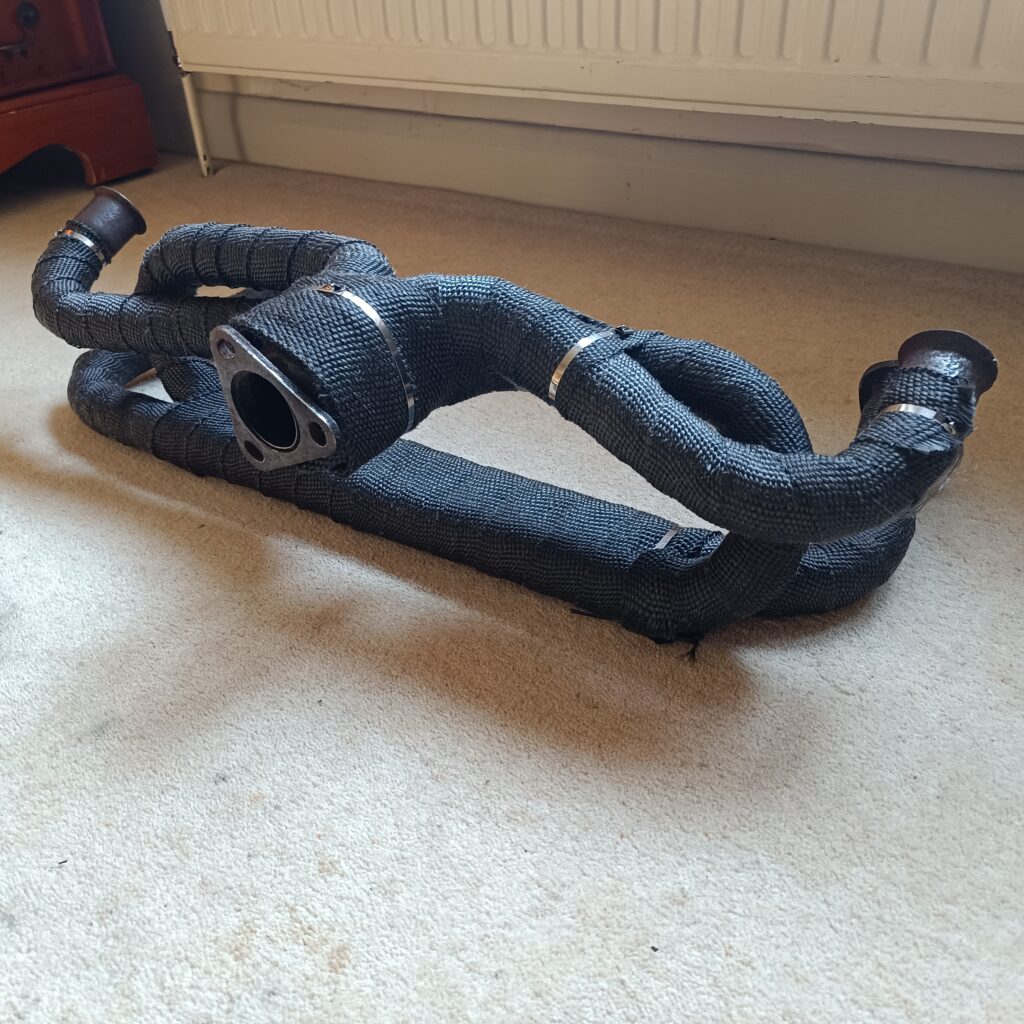
This issue’s gadget is “exhaust wrap” or “exhaust bandage”. Engines get hot – air cooled or water cooled, it doesn’t matter – there is heat being generated from the combustion of fuel and getting the heat away is a key part. With the exhaust being in close proximity to the engine and the by products coming out of the exhaust, it naturally gets hot and the radiating effect means that anything nearby is heating up.
The bandage wrap acts as an insulator, keeping the heat inside the exhaust, thereby keeping the heat away from around the engine. Even if it is only a small benefit, it is a benefit. It also looks nicer than a slightly rusty exhaust manifold.
The wrap is easily available from motor factors and online and costs between £10 and £20, there are a lot available and most comes with metal ties to make a neat job.
Removing the exhaust manifold is optional but was done on this one as the engine was out of the vehicle. Starting at any end, start wrapping the bandage around the manifold tightly trying not to get too many layers on any section. As you get to a suitable point, use one of the ties to stop it unravelling – the start will be kept in place as it is under the next row BUT it is easy at this point to tie that one off as well for completeness. You can wrap it as neatly as you wish, you may as well use all of the ties that come with it.
Some of them are glass fibre or have other heat retardant materials that can make your hands itch, so take suitable precautions.
The next edition of the club magazine has been finished by our Editors and looks fantastic. It should be arriving through your door soon! If you are enjoying the club magazine and have a story about a trip, an upgrade, a restoration or just a tip, send a contribution to our Editor at editor@vwt2oc.co.uk.
Yes, it is that time again. Hurray! Finally, after the long winter in our non-mobile houses, we can get out our beloved vehicles.
Checklist
Hopefully you all followed the article Time for bed/ to help put your vehicle to bed for the winter. Now that spring is in the air and we are starting to think about getting out and communing in nature, this is a key time to get things ready.
Doors locks – there’s nothing more annoying than a failed lock. get it fixed now before the season really gets going. Door lock issues can be very straight forward but a simple lubrication can be key. Pun intended. A non residue lubricant is best to move the dirt away as WD40 can leave enough gunk to create issues. We favour silicon spray. A little into each lock.
Windscreen wipers – did they perish in the cold winter freezing them to the windscreen. Inspect and replace now.
Water – check the radiator if you have one. Ensure that the bottles that you emptied in the Autumn / fall have no mice, carefully hidden Christmas presents or mildew. Clean with a weak Milton solution if it is drinking water or food related.
Batteries – check the charge on each battery with a good meter. A flat battery can indicate an earth leak. A failed battery needs careful investigation.
Carburettor – Or equivalent. Check for good operation, no stuck flaps or other deterioration over winter. If you are a professional, this will be straight forward. If you are an amateur, a test drive very close to home will highlight problems! But only after the other checks.
Brakes – your vehicle should roll easily, otherwise this can indicate jammed brakes. Parking in gear for long periods of time can be better for your brake health than a jammed set of brakes. Check the brakes for operation. Check the brake fluid level. If it has been more than 5 years, change the brake fluid as it is hygroscopic and slurps up water incredibly quickly. Water is not a good fluid for applying the brake pads to the disks.
Seals – inspect all door seals for any signs of damage, water ingress or other problems and sort them out now. Glue any loose bits back down with the correct glue.
Windows – ensure that they all open and close fully. Or at least as fully as they did last year if applicable!
Ignition – Once you are feeling confident, get in to your pride and joy and turn on the ignition to number 2. Look at the lights on the dashboard. Check there ARE lights! Are they what you expect / are used to seeing? Have you got fuel (for those with a working fuel gauge)?
Crank it over – don’t expect it to start immediately but things should kick into life within a few seconds.
A little test drive on your driveway will allow you to test the brakes, maybe the steering and other important parts. Softly, softly.
Stay local, take your phone with you and warm clothing. Just in case!
Once you get home, assuming that you have a big smile on your face, make a list of snags, get indoors, put the kettle on and start planning for your summer.
Check out the events page and come and see us at a meeting soon!
Ingredients – Serves 2 1 pack of about 8 chicken drumsticks 2 green chillies 2 red chillies 2 tablespoons of Balsamic vinegar 2 tablespoons of lemon juice / 1 lemon juiced 1 tablespoon of honey Some dried mixed herbs
Yes, dried mixed herbs again – a staple in the camper van! Using a sharp knife, slice across the flesh of the chicken down to the bone to allow the spices to penetrate. Add all of the ingredients to a flat dish and get the drumsticks coated. Leave them to marinade for at least 30 minutes but overnight is even better. Wrap the drumsticks in foil but don’t stack them then either cook in a frying pan or on the BBQ tipping the leftover marinade from the dish over the top of them. Cook thoroughly! For adding wow factor, add a little lemon juice and some fresh green herbs on top as you serve them alongside crusty bread and salad. And a glass of something of course!
Some people like a TV in the camper van for those longer, darker evenings when there is no club marquee to sit and natter. Others like it for specific events such as Wimbledon (which we put on the club TV by the way).
Another option instead of the TV is to use a portable projector. James and Marina Reeves, part of our supportive management team introduced us at a recent event to the Anker Nebula capsule, miniature projector. Just 6 inches / 15 cm high, this little cylinder has a built in battery that lasts 1.5 hours in standard mode and up to 4 hours otherwise. At 200 ANSI lumens, it does really need a dark evening but can project an image from its tiny cylinder onto any flat surface – a 40 inch (1 metre) diagonal picture from 4 feet away (1.14m) up to a colossal 100 inch (2.5 metres) diagonal picture when the surface is 3 metres / 10 feet away. We tried it on a planked shed and it looked incredible.
You can stream anything from YouTube and Netflix, plug in a USB stick with movies on it, there is even a remote control!
Ingredients per person 4oz dried pasta 1 onion Some mushrooms 1 tin of chopped tomatoes Dried mixed herbs 3 cloves of garlic 1 large sausage such as garlic sausage or venison or other strong flavour Small glass of red wine Oil or butter for frying
Cook the pasta and set to one side. Reuse the pan! Fry the onion until softened and starting to go translucent, then add the garlic, herbs, mushrooms and sausage. Cook all of this for 5 minutes stirring occasionally until nicely coloured. Add the remaining ingredients and cook for a few more minutes. Add the drained pasta to the pan.
Serve with crust bread and perhaps a glass or two of that red wine – it seems a shame to let the rest of it go to waste!
The next edition of the club magazine has been finished by our Editors and looks fantastic. It should be arriving through your door soon! If you are enjoying the club magazine and have a story about a trip, an upgrade, a restoration or just a tip, send a contribution to our Editor at editor@vwt2oc.co.uk.
The first van I converted was a T4 Caravelle. It came with all the usual interior trim so was left in place for a more professional finish. Saved a lot of lining out labour as well. The next project was a T5 panel van – a blank canvas. On looking at this blank canvas I was surprised at the amount of space within the panel cavities. As I was going to carry out a rear kitchen conversion, meaning less storage space, I decided to utilise all those cavities by constructing pockets and cupboards within the lining out panels.
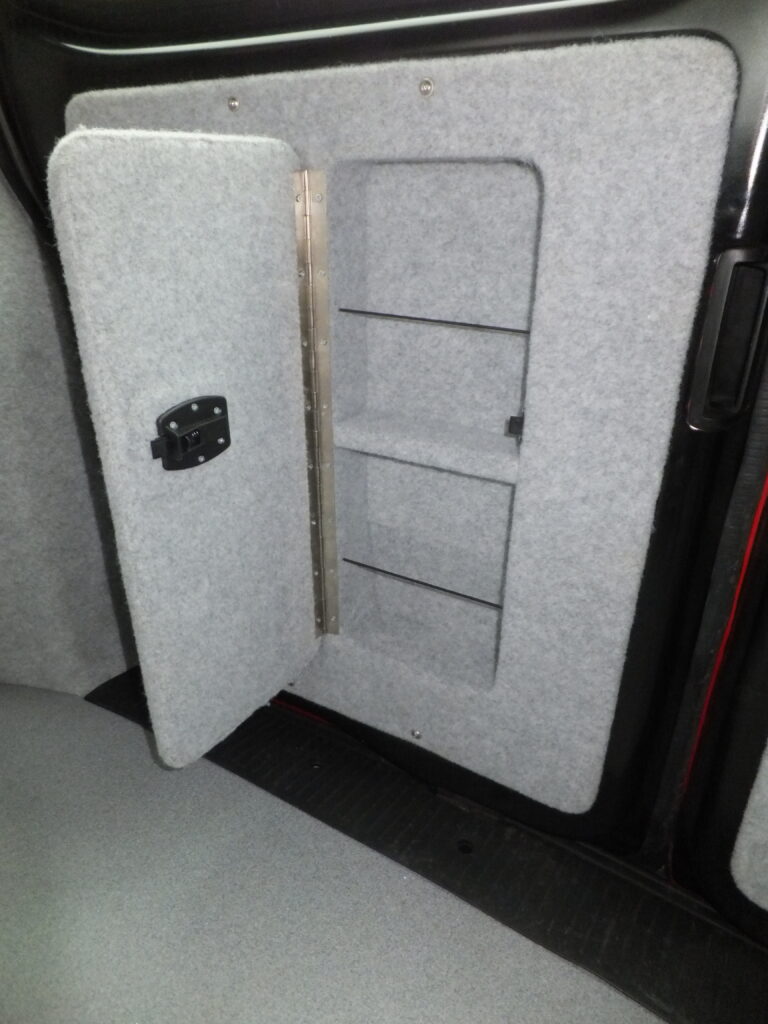
The van was a barn door model. The nearside door was too full of door lock etc to be viable but the offside could be made into a good-sized hinged door cupboard. All the other panels could be used to construct door pockets in. The construction I used was the same for all except the rear door had a hinged door with a catch attached to it.
Panels were cut to fit using 3.6mm plywood. Covered with 4-way stretch lining carpet to match the rest of the rear lining and attached with a combination of panel fixings and s/s flanged bolts going into rivnuts. The plastic fixings not being strong enough to hold the panels to the van walls. Harrison’s trim and Megavan mats are good sources for lining carpet, adhesive and trim clips. The rivnuts need a rivnut gun to be fitted and a drill of the correct size to enlarge the holes where they will be used. I tend to use manufacturers bodywork holes – the less holes drilled the better for me.
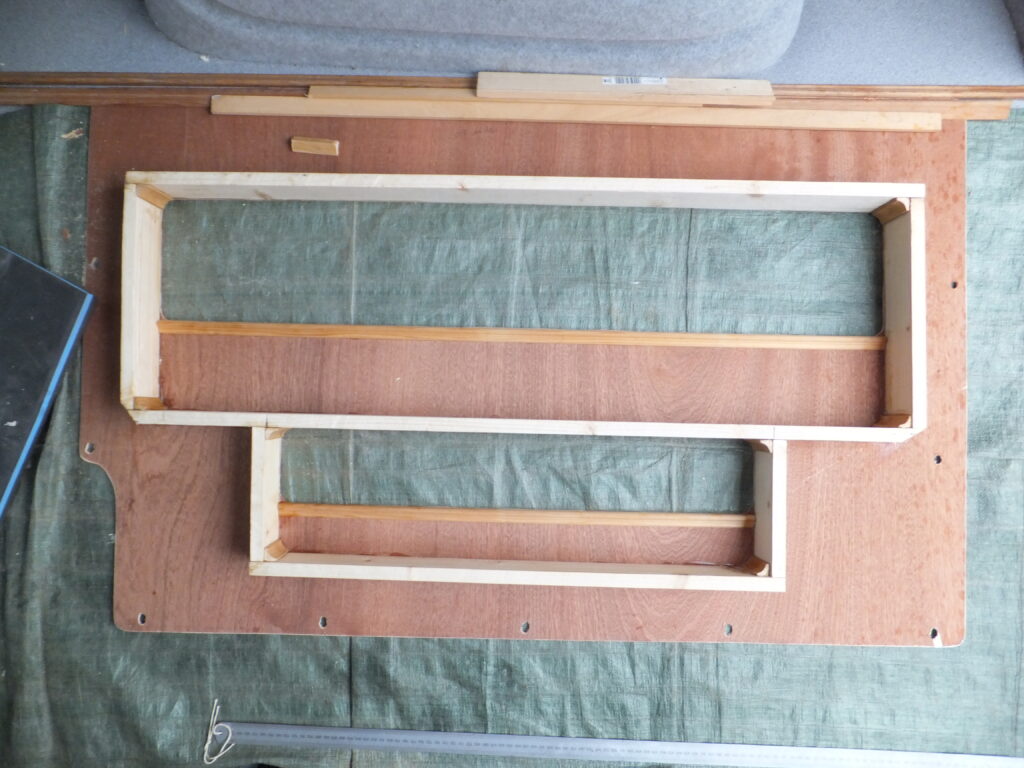
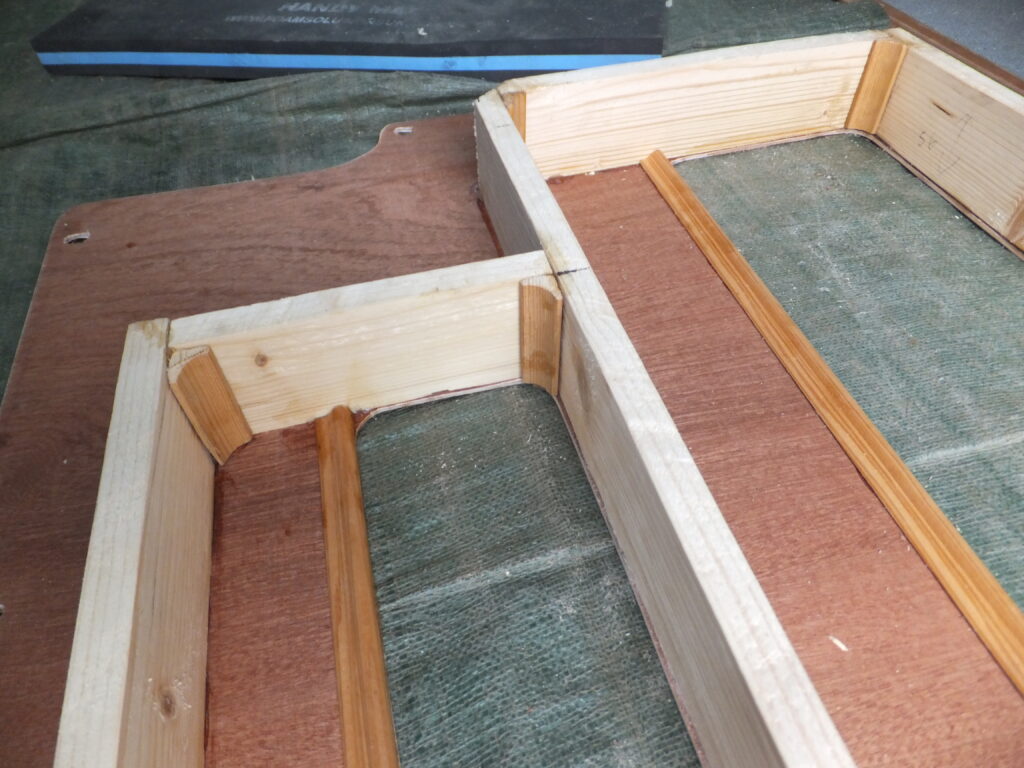
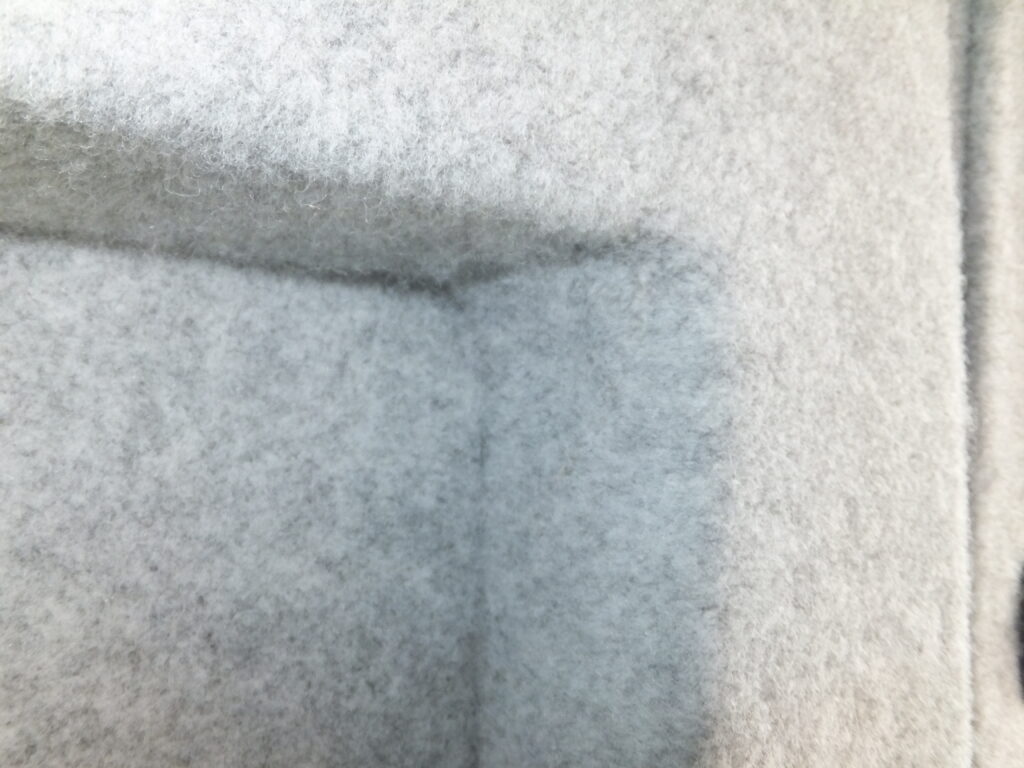
For each panel I had to work out available cavity space and position it on the plywood panel. Access holes were cut, and a box frame of softwood battening was glued and nailed to the rear of the plywood panels. To the rear of this frame, I glued and nailed the backboard plywood. Before lining the panels, I took the hard edges out of the corners by gluing in some quadrant and beveling with a sanding wheel in a Dremel.
To finish holes were drilled at either end and a length of bungy cord passed end to end to help retain contents. This is especially needed on the sliding door as the last thing you want is something scratching the rear exterior paintwork as the door opens.
Don’t know what cavities are like in other models but with regards to the T5 I found the offside middle to be the most useful panel giving two good sized pockets. The sliding door gives three shallow pockets, the rear quarters are probably not worth the time of constructing and the rear offside door gives a very useful cupboard.
All in all, constructing these pockets was time consuming. I’m not the fastest and I’m sure others could come up with quicker methods but I did find them to be useful storage. Ironically my latest project is a T6 kombi conversion, and I have stored the table to the offside middle so no pockets there and I don’t want to risk bodywork damage on the sliding door side.