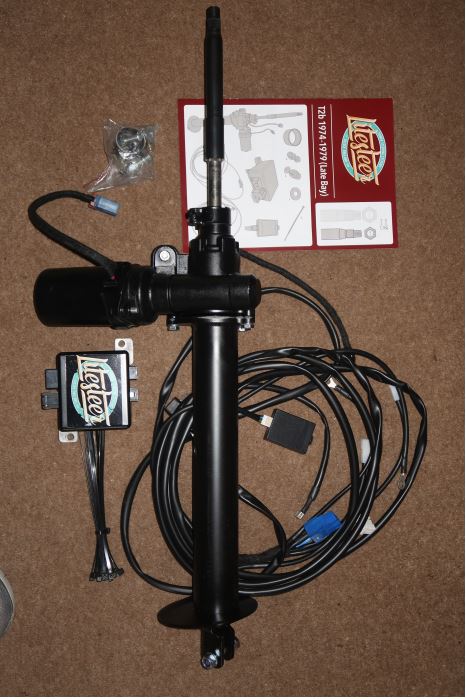
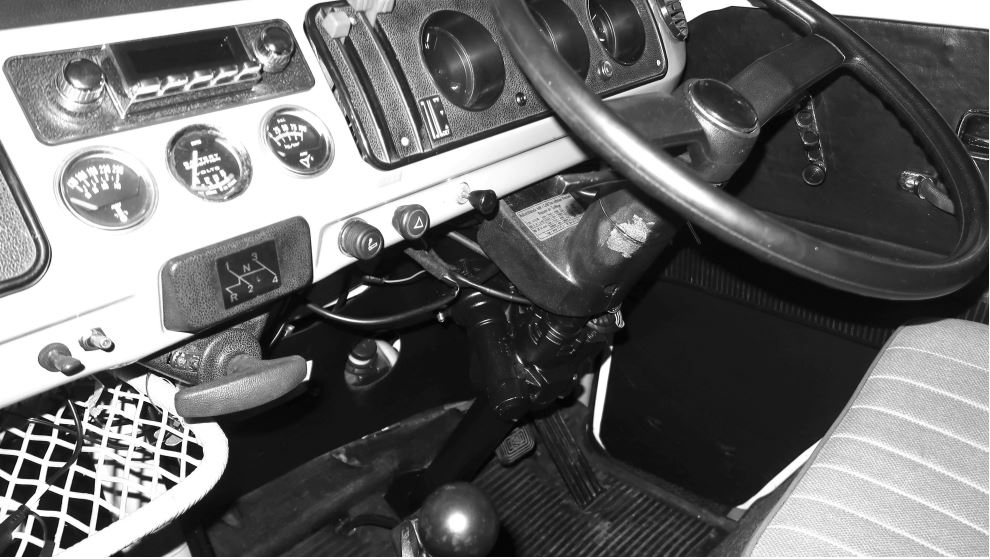
After talking to Nick at the AGM, I told him that I was fitting a “Litesteer” to my 1979 late bay, he suggested it would be a good article for the magazine. The Litesteer kit is not the cheapest but on delivery, the quality of the kit I received was very good, and the instructions easy to follow. Plus a 10% club discount was a bonus!
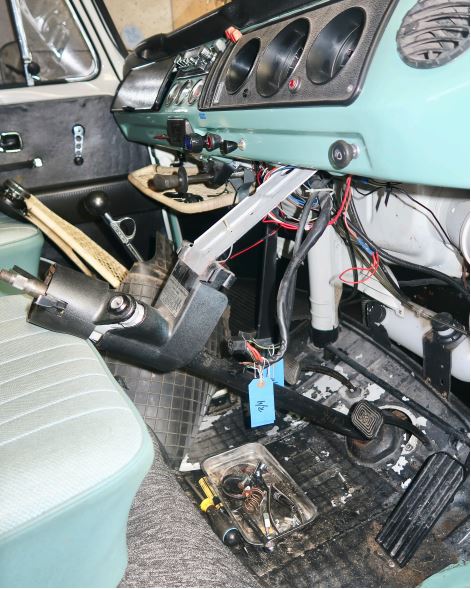
The parts and harness are of top quality and made to last. First job was to remove the old steering wheel column, disconnect the battery and remove the pedal cover.
Next remove the kick board, rubber mats, disconnect wiring, remove steering wheel and disconnect the column from the steering box.
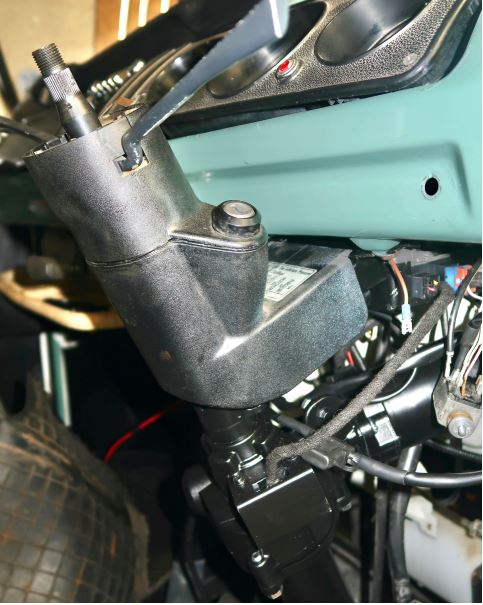
Next the column needs to be cut, using the spacer this give you the exact position to cut the column to ensure it fits without error. The plate then needs drilling to take the ECU, fitting the new unit was easy.
Next run the harness under the van to the battery and connect to the positive terminal, follow original harness and clip to it. Plug in four connectors to the ECU and one to the light switch.
Connect battery to earth and you are ready to go. I could not believe the difference it has made, it is like driving a new modern car, Baldrick is better than any T6 VW camper. With its 2000cc Type 4 engine and twin choke Webber, large sump oil cooler it makes a very good tow bus.
The whole process takes only a few hours with the box of parts costing between £834 and £1,194 depending which vehicle and they will fit it for £300 extra. Remember that you can get 10% off as a club member!
Another option instead of the Litesteer is a package available on eBay for £295. This also takes a few hours and needs the steering column cutting but this package does need a small amount of welding of the steering column as well plus a bracket to stop the column from twisting. Just search eBay for “Bay window power steering”.
Have you ever been in the situation when coming up to a set of traffic lights and you have picked your braking point when someone comes up the outside of you and jumps in front then brakes hard? Stopping in a shorter distance can be difficult and that is why I decided to upgrade my brakes. Most people know that it is possible to upgrade the brakes on a late model T2 by fitting the Porsche calipers, but you must have 15 inch rims to be able to do that.
My van is an early model with 14 inch rims and I wanted to upgrade my brakes without having to replace the wheel and tyres, because this affects your speedometer, unless you keep the same rolling radius by fitting different aspect ratio tyres. Porsche callipers will not fit inside the wheel rims of an early bay. There is also the issue of caliper offsets relative to the disc. The offset from the caliper to the disc is different between early and late bays.
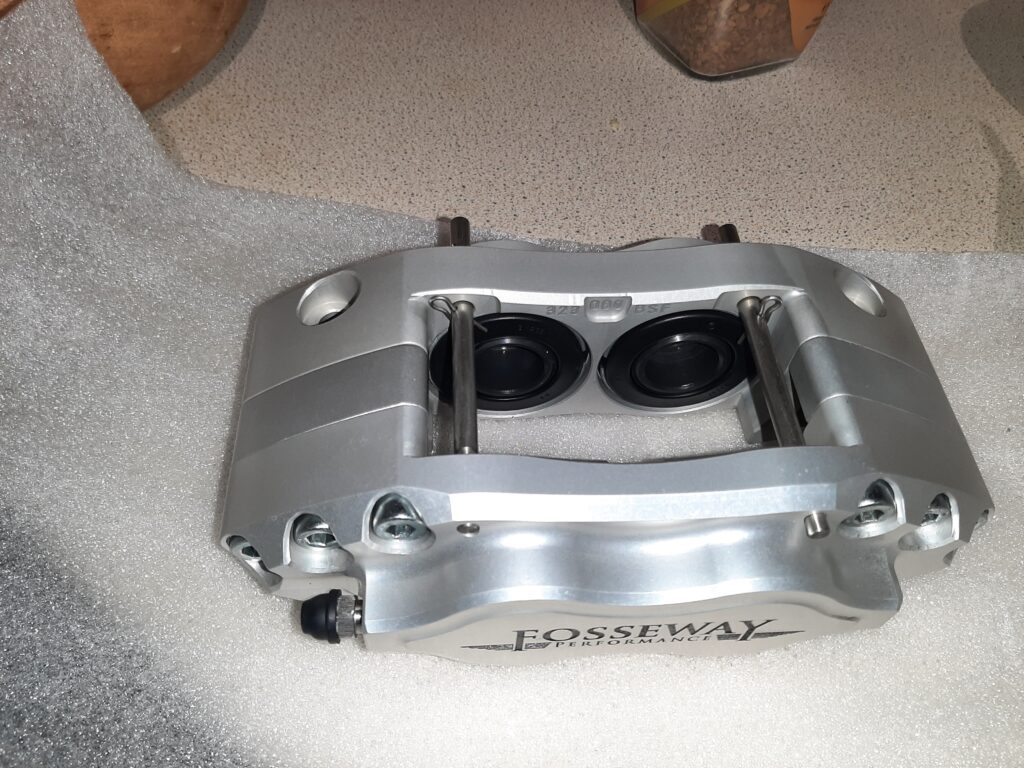
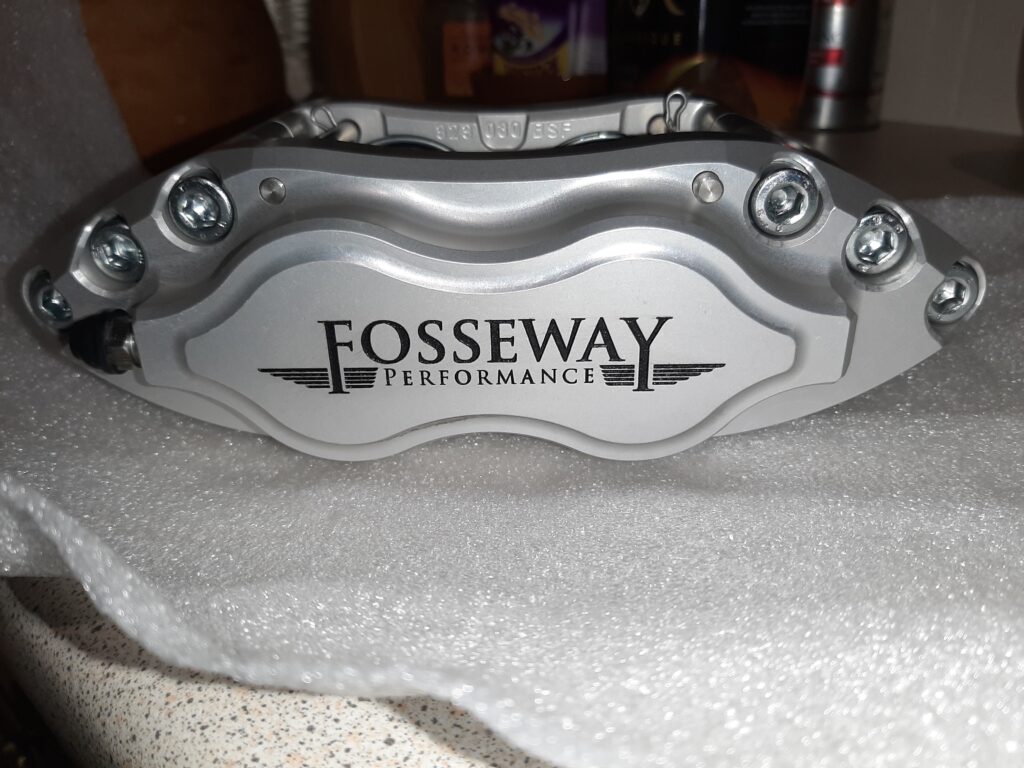
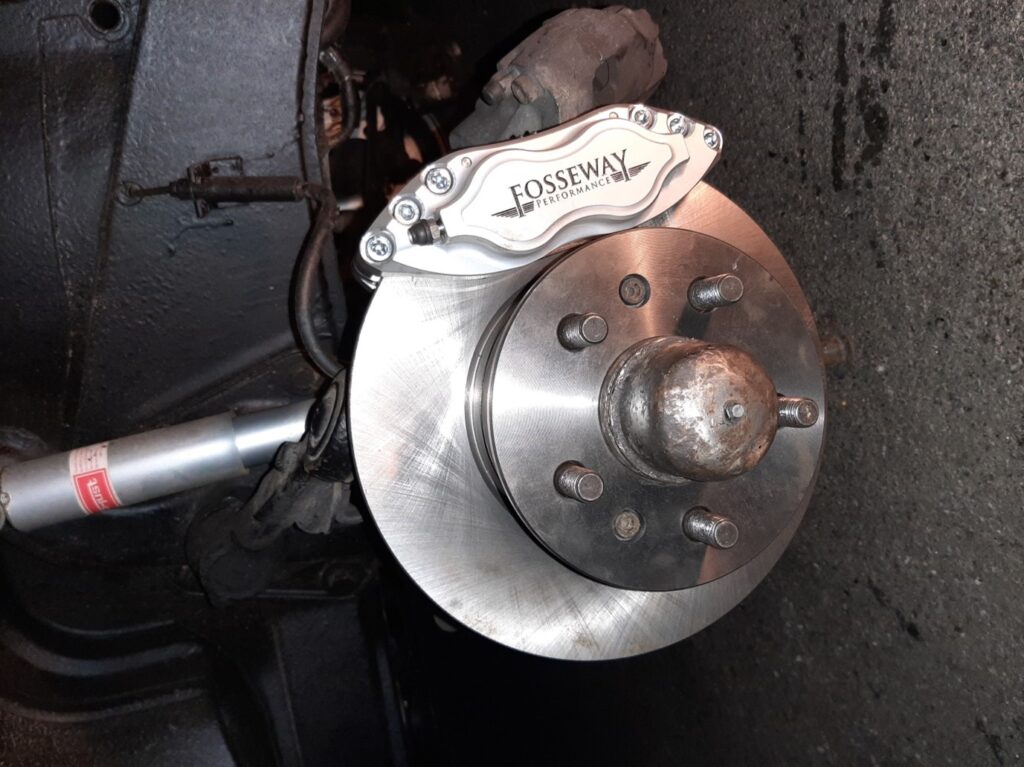
After a little research I came across a Company called “Fosseway Performance”, based in Gloucestershire. They make kits for both the early T2 and the Late T2 braking systems. Their kits consist of new calipers, pads, anti-squeal shims, flexible brake lines, flexible brake pipe clips, new mounting bolts and mounting brackets. The mounting bracket and bolts are what makes the kits different between the early and late bays. The supplied brackets also change the caliper offset to the disc. The bolts are also different between the early and late bays and so it is essential to correctly specify what you need. In both cases you need to replace the discs to the late model.
Each caliper has 4 pistons which improves the braking efficiency by 30% by being able to apply more pressure to a larger brake pad. The calipers are made from a single alloy billet and they are beautifully made. They are also lighter than the standard calipers which means it lowers the unsprung mass of the suspension system.
The kit comes with a comprehensive set of instructions and is relatively easy to fit. In order to fit them you will need to remove the dust covers from the discs and throw them away. To be able to do this you will need to remove the outer hub carriers. I found that someone had rounded the bolt holding the hub carrier to the stub axel and so had to grind this off and replace it with a new one. If none of this makes sense to you then I would suggest you get someone else to do the work but in reality it is very simple. You will need to bleed the whole braking system afterwards. Again if you do not feel confident to do this, take it to someone who does, as this is your life at stake.
If you do decide to upgrade your calipers it is essential to replace the discs as well. The new pads need a new clean flat surface to bed in to. The company can supply you with cross drilled discs but for a van which is not going to see high speed repetitive braking this will actually reduce the braking efficiency and I would suggest you just stick to standard discs. They will need around 300 miles to bed in and it is essential that you do not brake too hard during this period as it will glaze the pads. The pads come coated in a ceramic a compound. Once this happens you will not have an efficient braking system and will likely need to replace the pads.
My personal experience with the kit is that they are very well made and make a world of difference to the stopping of the van, especially going down very long steep hills when fully loaded for a camping trip. Cost? – well not cheap but how much would it cost to fix your van if you cannot stop??
Most of us will have a USB socket in the camper van, but are you using it for more than just charging your phone?
Fan
An 8 inch fan powered on USB will keep you cool in summer and can be purchased for under £15. We have one similar to the one in the picture and it hangs neatly upside down from the roof aperture on the Dormobile.
Power pack
If you are charging your phone then going out, sometimes you need just that little bit extra. Or if you have no leisure battery and only use USB when driving to avoid flattening the starter battery, this is another option.
A Power bank is a battery with a USB or two to keep your mobile charged when away from a power source. You can also use it when outside to power the fan when sitting outside enjoying the warm weather. Power banks are readily available but be careful buying the really cheap ones – they are often very small capacity. Look for at least 10000mAh (milli amp hours) and avoid anything with claims of more than 100,000mAh – they are not that powerful! Expect to pay around £20.
If you own an iPhone, you do not need to buy a battery pack that says that it is suitable for an iPhone. They are all USB and they all work fine!
Toothbrush charger
We used to take out bulky toothbrush charger with the 2 pin shaver plug and the 3 pin converter. Then every few days whilst at a camp site with a shower (we cannot go too long without a proper shower and have not invested in the Karcher portable shower as featured last issue), we were plugging that into the socket in the shower blocks! Then we discovered the joys of USB. Now we charge when we want, in the van and the charger is a lot smaller – every little helps! These can be purchased online for under £5 and now we have the big one at home and the little one permanently on board!
WARNING – if you have the 240-volt charger for a toothbrush, do not use it with an inverter on your vehicle. The electronics in the charger will flatten your battery.
Voltmeter
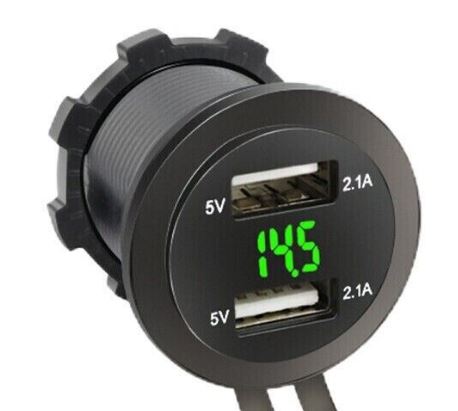
Upgrade your USB socket! Whether you have 1 or 2 USB sockets in the standard round hole, replacing it with a built-in voltmeter will give you easy access to check the charge level of your battery. Available for about £5, there are 2 pins on the back that you can pull the cables off the existing one and replace with a new one. Or supplement a new pair! You can never have enough USB sockets – we have 1 in the front, 2 by the sliding door and 2 each above where we sleep (charge the phone and run the fan at the same time!). Available for about £7 each which is almost the same price as buying a pair of USB sockets without the voltmeter.
Just be wary of buying a really bright voltmeter and fitting it right where you sleep! They can be very bright!
A variation to the Mechanic this time as so many people at club events ask Malcolm and/or Nick about solar. If you want to be off-grid / not using expensive hook up on a site or when that is simply not an option, you can keep your leisure battery topped up with a solar panel.
To help members, Nick got in touch with Just Kampers (owned by one of the club founders Mark Reynolds) to ask about their Solar Charging Screen, to see what it does and how it works. Josh from the JK Team got back to us straight away and told us the following.
He says:
“I’m a big fan of the JK Solar Charging Screen, after getting involved with bringing it into the range and having put it through its paces at VW shows and photoshoots for Just Kampers. For anyone who hasn’t seen one, the charging screen is a solar panel array which folds out from tote bag size to give you twelve solar panels for capturing that elusive sunlight to turn it into electricity. There’s a power outlet hidden away on the back of the screen, which has three USB outlets for charging up phones, as well as a DC outlet you can use to charge up your main vehicle battery or leisure battery.
The kit also comes with six really strong suction clamps, which you can use to mount it to the inside or outside of your vehicle’s windscreen. We designed it to fit the inside of a VW T6’s windscreen, but it’ll go onto any vehicle, and it’s just as useful when you just spread it out over the ground or hook it onto your windbreak.
We took one on a JK photoshoot last summer to keep our phones topped up, and it worked really efficiently. It’s definitely something I’ll take next time I’m camping, to keep our tablet charged up (and therefore my kids quiet while we drive!), and to ward off a flat battery. I usually work on the theory that you’ve got spares and tools and stuff for a breakdown, you’re somehow less likely to actually have one!
If you’ve got some epic adventures or road trips planned for your camper, a JK Solar Charging Screen is definitely worth taking a look at, especially if you’ve got a fridge, interior lights, laptop, camera, etc. on board.
If you do take one on a cool adventure, we’d love to see some photos!
You can read up on the technical specs and other information (like what a monocrystalline solar panel is) at justkampers.com/jk-solar-screen/ or scanning the QR code here.”
This is a variation of my lovely mother-in-law’s excellent phrase, “Don’t put it down, put it away” (thank you, Millie!). Most marked when you first start campervanning and take far too much stuff, this tip helps reduce frustration. How? Well, when you inevitably need to move stuff around to get to the item you’re looking for, at least you only need to move one trayful of twenty items, instead of twenty individual pieces!
I don’t know about you, but I am at the age when I need to wear glasses when I read, or anything else when I come to think of it. I love to read for a while in bed especially when I am all snuggled up in our T6 campervan Ginny and this is where the problem starts. It’s easy to pop your book under the pillow and it doesn’t really matter all that much if it slips down the side of the bed, however, where do you put your fragile spectacles to go to sleep? If I had a pound for every time that I have had to get out of the van to retrieve my glasses case and my mobile phone/torch from under the rock and roll bed, I would probably be driving around in a fancy VW California.
In our first van Misty the T25 Holdsworth Villa there was a shelf overhead so you could pop your book, glasses, torch, mobile phone, midnight chocolate supply etc. on it to go to sleep. We do not have this luxury in Ginny and we didn’t want to start drilling holes to fix a shelf and Steve was getting fed up with me waking him up every time I had to lean over him to put my bits and pieces on the work top area. So, what to do?
After trialling all sorts of weird and wonderful ideas including sticky Velcro (not good when you get your hair caught in it – don’t ask!) and with the help of You Tube, I discovered the joys of Magnetic Hooks.
You can buy them in all sizes and weight bearing capability, and if there is a metal base you can move them around the van to suit your needs. If I use them on the outside of the van, I do put a small piece of thin fabric between the metal and the magnet just to protect the paintwork.
We use the Magnetic hooks for a wide range of things including but not limited to:
Hang my glasses and phone bag on at bedtime (yay)
Coat and hat hooks (great for hanging up wet clothing)
Hooks to keep the dog lead on and other dog related apparel
Internal and external fairy light holders (I love a fairy light!)
Shopping bag holder to keep shopping goodies off the floor and away from doggy temptation
Rubbish bag holder
Washing line holder fixed between the barn doors (perfect for rinsing out your smalls)
Securing an old shower curtain to the barn doors for privacy when taking an outside hand shower and perfect for holding the towel and toilet bag.
I can go on, but I think you get the idea. I bought ours from Amazon from the Ant Mag Store and they are called Heavy duty magnetic hooks 36KG (80LBS). As at the date of writing, they cost £15.99 plus postage for 6 though there are certainly deals to be had for different sizes and quantities and other providers of course. As with all these things, read the instructions of use carefully, take care to where you put them, I found that popping one in the middle of the top of sliding door wasn’t a wise move and I wouldn’t attach one to any of my electronics or my mobile phone.
Last time, Thomas covered the restoration of the underside and windows of Libertine. He continues:
A friend of mine moved down to Cornwall, taking his hightop VW Splitscreen with him. At the time, he used it as his main mode of transport. Trouble was, he used to give it a hard life and drive as fast as he could anywhere. This took its toll on the old reduction boxes. Constantly having to give them attention because the seals kept leaking. Personally, I thought that he drove too fast and there was too much pressure in the reduction boxes. I don’t know how he did it, but he managed to get the old bus to drive at seemingly crazy speeds. Perhaps it wasn’t and it just felt like that.
One day he rang me to say that he had crashed and ended up in a hedge, leaning at an angle. He was unhurt thank goodness. The bus was badly damaged down one side. The brakes had failed while going downhill approaching a bend. His only course of action was to go through the hedge.
I mention it here because of the cause of his brake failure. An insurance assessment revealed that the rear backing plates had corroded. When the brakes were applied going downhill, the rear brake shoes locked against the drums as they are supposed to. The trouble was, the corroded back plates spun, wrenching them from their mountings and parting company with the brake hoses – no brakes!
My friend kept his van mechanically fit and regularly maintained and examined other than the annual MOT inspection required at the time.
Being concerned about my friend’s accident and the near loss of his bus, I went outside to crawl under my bus and examine my bus. Mine is a 1973 T2, so I expected things to be all well in the back plate department. To my horror I could not have been more wrong!
The back plate metal on both sides at the rear had corroded where the back plates bolt to the hub. I did poke it hard with a screwdriver, so perhaps more than would normally be done on an MOT inspection. Something had to be done and quickly. Biting the bullet I ordered a load of parts from a well-known parts supplier (No, not ‘Just Kampers’ at that time). I had now owned the van for some years and never needed to change the rear shoes. Yes, there was so much ‘meat’ left on the brake shoes from careful driving I suppose. Even so, I was going to give Libertine a full overhaul of rear brakes. Stuff it I thought – all the brakes!
I ordered new brake callipers and pads for the front. Proper German parts as well. Full set of flexible brake hoses, full set of brake shoes for the rear, new backing plates, brake cylinders, springs, hand brake cables. Stuff it, may as well order two rear brake drums whilst I’m at it.
This parts list soon adds up in price. However, my life and that of myself and family and friends are worth so much more. The parts arrived in very quick time. Being very pleased with all these shiny parts was a great feeling when spread on the kitchen table – where else!
Noticing that the VW parts supplier has charged me very little for my order I telephoned them to say so. Being passed on to one person then another I eventually spoke to the manager. Telling him of my problem (not enough charged) he asked if he could call me back later. Doing so, he explained that he had never before received a complaint (it wasn’t a complaint I protested) that his Company had not charged a customer enough for their order. This being so, he informed me that as a reward for being an honest customer he wanted me to accept the order with his thanks and compliments. WOW! What a result.
Setting to work, I jacked the bus up on heavy duty axle stands and began cleaning and stripping parts off. The drums looked serviceable, but everything had given good service since 1973. The backing plates were in bad shape. Underseal had hidden their real poor condition. Flexible hoses are expendable items in my view, but were changed anyway. Replacement was a reverse procedure as removal. All went smoothly except the handbrake cables. Although functioning, the outer cable covers were full of rust. I had reached them in time. Assembly of front disc brake callipers went smoothly. Old ones off, new bolted on. A full change of brake fluid followed.
All was now well. A test drive proved that. My friend’s accident had potentially saved me from the same fate. His VW van was eventually fixed and beautifully repaired, and drives around Cornwall to this day. With a different owner now, and perhaps not as fast.
Since the major brake replacement Libertine continued to serve me and the family well. Six trips to France and Ireland as the family grew up. Using it whenever I could.
It was now 2012, and the Olympic Games were being held in the UK. Being an Army Reservist for many years, I was mobilised to do certain work at the Sailing Competitions at Portland, near Weymouth in Dorset. The nature of my work there prevents me from discussing it here, other than to say it was both interesting and informative. If the general public only knew what went on in the preparation, ongoing events and aftermath of something like the Olympic and Paralympic Games you would be amazed. I certainly was, and I was to be in the centre of it all – in my Bus !
My attendance was going to be for some time. Because of the nature of my work I was given a special pass. Calling this my ‘Willy Wonka Golden ticket’, because only a few were given out and it allowed me to go anywhere and park anywhere. Not even the Police (who I worked closely with) could stop me. This was a power that I intended to use to its full extent. Whenever would I get the chance to do this again in my lifetime?
Of course, I had an important role to play, and Libertine would be a part of it.
This week, we focus on valve clearances on Type 1 engines (Beetle, Split Screen, Bay window and early T25s), courtesy of 2-year club member John Hawthorn and his 1980 Westfalia Bay window. If you have a technical way forward with your vehicle, email editor@vwt2oc.co.uk for inclusion in a future post.
MY EXPERIENCE OF VALVE CLEARANCE SETTINGS AND OTHER MUSINGS by John Hawthorn
I drive a Volkswagen Transporter 2, 1980 Bay Window model with a 1600cc AS series engine. I like to try and do servicing work on the vehicle myself and leave technical, or jobs requiring specialist tools, to the experts. This my experience or musings about setting the valve clearances.
Setting the valve clearances, or tappet clearances, is very important if you are going to get the best performance from your four stroke, pushrod engine. The clearance is to allow for expansion when the engine gets hot. If the clearance is too tight the valves may not close correctly, leading to poor performance, damaged valve seats, a lot of popping and banging through the exhaust or carb, and the engine not running at all because it has no compression. To have the gaps too loose affects the valve timing. The valves will open too late, will not fully open and will close too early. The whole point of the valve timing, which is initially determined by the shape of the lobe on your camshaft and getting the camshaft rotation setting correct, is to maximise the efficiency and performance.
My first experience of tappets was when I was 16. My Triumph Tiger 100, a 500cc four stroke engine, had oil leaks from the pushrod tubes, which I decided to fix. Yes, I am that old. Having passed my test at 16, I was legally able to ride an unlimited sized motorcycle without a crash helmet. I had previously only worked on two stroke engines. I removed the engine head, as you need to do, replaced the rubber gaskets, and rebuilt the engine. I then went for a test drive. The engine popped, banged, and backfired. On my return home I consulted my Dad. Originally, he taught me all I knew – he was my mechanic mentor – and importantly he let me learn by trying to do it. So, when I consulted him, he asked if I had set the tappets correctly. I said “No. I left them at the original setting and just bolted the head back on”. If you strip the top end of your engine, you must set your tappets after a rebuild.
My next experience of setting tappets was on my JAP engine speedway bike. If you know speedway you will recognise that in terms of motorcycle racing it is really a sprint. A race usually lasts less than 70 seconds (even I could beat that) and you start with the engine warmed up and ready. You are not likely to add much extra heat to the engine in a race, and therefore no increased expansion. It was also convenient that the tappet adjustment was on the pushrod end of the valve rocker. Our method of valve clearance adjustment was to get the engine hot then tighten the valve clearance so you could just spin the pushrod with your fingers; practically no clearance at all. A method I am still often tempted to follow if I physically could, but perhaps a bit risky if you are about to set off on a long journey and get the engine really hot!
As I gained more knowledge and experience, my slightly OCD nature started to manifest itself. I looked for tools and devices that would enable me to adjust and tune my engines more precisely. I bought an Engine Analyser, primarily so I could set the Dwell Angle on my ignition points and not rely on feeler gauges to set the points gap. It was at this period that I invested in a Gunson Tappet setting tool. For those who are not familiar it incorporates a screwdriver and socket, as opposed to the screwdriver and ring spanner you would normally use. It also has a torque sensitive micrometre cap. When you wind the cap, the screwdriver tightens the valve clearance. When it clicks the valve clearance is fully closed. By knowing the pitch of the thread on the tappet screw the tool now allows you to “back off” the clearance by clicks to set the correct gap. In practice I found this reasonably successful when leaning over an engine bay on a standard saloon car, but not so reliable lying on my back under a VW T2. I could not trust that the thread did not move as I tightened the lock nut, and I resorted to checking with a feeler gauge anyway. The supposed advantage of the tool, when used correctly is that it should be more accurate. On an old engine, the valve stem may have worn an indentation into the rocker arm in which case the real clearance is between the valve and the bottom of the indentation. As the tool relies on you closing the gap fully and setting it from there, this wear is taken into account. A feeler gauge pushed between the valve stem and the rocker will bridge the indentation and make no allowance for it.
And so, to my recent experience. As part of an engine service, I had reset the valve clearances. I had tried to use the tool but resorted to using a pack of feeler gauges for measuring the gap, a screwdriver for the tappet adjustment screw, and a ring spanner for the locking nut. Three tools and only two hands whilst lying on my back. I had not even bothered to put it on ramps or jack it up. If you have tried this, you will know how clumsy a pack of feeler gauges can be, particularly if you have a mixed metric and imperial pack. As I was about to get under the vehicle once again, I noticed that the screw and nut holding all the feeler gauges was loose to the point of falling off. I thought I had better sort that as I did not want all of the feelers falling over my face onto the ground. Imagine having to sort them back into the correct order (or maybe just buy a new set). Then I had the eureka moment. I did not need the whole pack under the vehicle only the 0.006” or 0.15mm gauge. So, I carefully took them apart, making sure I kept them stored in the correct order, and went back under with only one feeler gauge. Life was much easier.
As it happens this experience fits very neatly with another aspect of my OCD nature. When I carry out a job on my T2, I record the tools I need to do the job. Not just the size of a nut and bolt, but whether a ring spanner will fit, or a ratchet spanner or only an open-ended spanner. Perhaps a socket will do, but is it six pointed / twelve pointed? does it need to be a deep socket? or does it need a slim socket? or even a tube spanner? As I build up my knowledge and database, I can also refine the toolkit I carry on the van. Why carry a full set of ring spanners and sockets if you know you only need half a dozen sizes? My investigation, so far, suggests that the only feeler gauges I need are 0.7mm for spark plugs; 0.4mm for ignition points, and 0.15mm for valve clearances.
OK, I have said it myself a few times, I am slightly OCD but I like to know my vehicle and have the tools I need to hand when I do a job. Does anybody else think the same? Are you interested in sharing the knowledge?
Postscript – Valve Recession
There is a slightly more technical issue that I experienced more recently. On the way to the VWT2OC camp at Petruth Paddocks in April this year, my T2 started to develop some loss of power issues. I could only go so fast; occasionally the engine felt like it had lost power for a moment; and it felt like I was feeling the throttle to keep the engine running at times. On the return journey we broke down a couple of times, but it seemed to start again after a short rest. Eventually we had to admit defeat and call the AA. I had noticed the engine bay was sprayed with engine oil but could not identify the source. The AA patrolman put his finger on the problem very quickly, and quite literally. The fuel pump was shot. The actuator is a rocker arm, driven by a push rod from the camshaft on one side and the other side pressing on the pump diaphragm. The rocker had seized to the pivot pin and, as a result, it had then worn the hole it fits in, thus creating the oil leak and disabling the pump’s efficiency. I replaced the pump, with new gaskets, at home, by removing the distributor cap; then the distributor (having marked the position before hand) – using a 13mm socket and a short extension bar for the distributor; a flat blade screwdriver for the fuel hoses on the pump and a 13mm ring spanner for fuel pump to engine block. I drove around for a few short journeys, and everything seemed fine. The next “trip” was to “The Magic Teapot Festival” near Shepton Mallet. We did not make it. On the M5 I felt the engine die and instinctively knew it was bad. This time neither the AA patrol nor I had any real idea what was wrong. I thought the engine felt a bit hot, but I have no temperature gauge. I was afraid I might have burnt out the valves. The engine has not been converted for unleaded fuel, and I run with Reddex Lead Replacement. At home I tried everything I thought I could do. Then I tested the compression on the engine. Compression on number 2 cylinder seemed very low and number 4 had no compression. I was now seriously contemplating a replacement engine. A couple of days passed and in a last moment of desperation I removed the rocker box covers and checked the valve clearances. None had any clearance at all. All the gaps had closed leaving valves permanently open. So, I reset the valve clearances and the engine was good to go. But why did all the gaps close? Of course, they are likely to close when the engine gets hot, but they should reopen as it cools. Jim, my neighbour then introduced me to a factor called valve recession. This is where the valves recede into the valve seats in the engine head because metal between the valve and head is lost. This has the effect of lessening the valve clearance as the valve stem moves closer to the tappet. It usually happens because of valve edges and seats burning due to overheating. Jim’s theory is that when the fuel pump failed, I was driving according to what the fuel pump would deliver. As I felt for the optimum throttle position, I was effectively running the fastest I could, but with a very lean mix of fuel and air. It was this lean mix that created overheating and started the damage to the valves. I think that ultimately, I will have to take the heads off and inspect the situation. At present it seems OK on short journeys. The important point is that I have no other rational explanation why all my valve clearances closed as they did!
By simply replacing your original dipstick with this Hot Oil Sensor and attaching the 18″ wire (included with the kit) to the oil pressure switch, you immediately begin to monitor your engine’s oil temperature. The oil pressure light at the bottom of your speedometer now serves two functions. Whilst continuing to monitor your oil pressure, it now provides the data from the Hot Oil Sensor as well. If your engine oil reaches 225 degrees Fahrenheit (107 degrees Celsius) the light will begin to flicker, indicating that you are approaching an unsafe operating temperature. Simply reduce your speed and the light will typically stop flickering, indicating that your oil temperature has fallen to a safe operating temperature once again. If your oil temperature continues to rise to 235 degrees Fahrenheit (113 degrees Celsius) the light will remain on solid. This is the temperature at which you should pull over, in order to investigate the issue.
The Hot Oil Sensor was created by Harold Brown in the late 1960s and remains virtually unchanged since the first one was offered for sale, over 50 years ago. Works in all air-cooled engines and is available from main stockists – and members, don’t forget to get your club discount!
Steve Tatner has another gadget called a Ridge Monkey, to go with his Frontier stove from last issue. He writes:
Michelle discovered these a few years back and have taken them with us ever since. They were originally designed for anglers, cooking while fishing by the riverbank.
They have removable magnetic handles which hold the top and bottom of the two pans together.
They are great for when cooking in the van, for instance when frying burgers, you have no need to try and flip the burger, just turn the pan over, its enclosed which stops oil and fat spitting everywhere inside your bus. The medium sized pan also has compartments which is very useful. They are dead easy to clean.
The Ridge Monkey range includes a toaster, thermos mug and water bottles with cooking pans complete with utensils starting at £20.